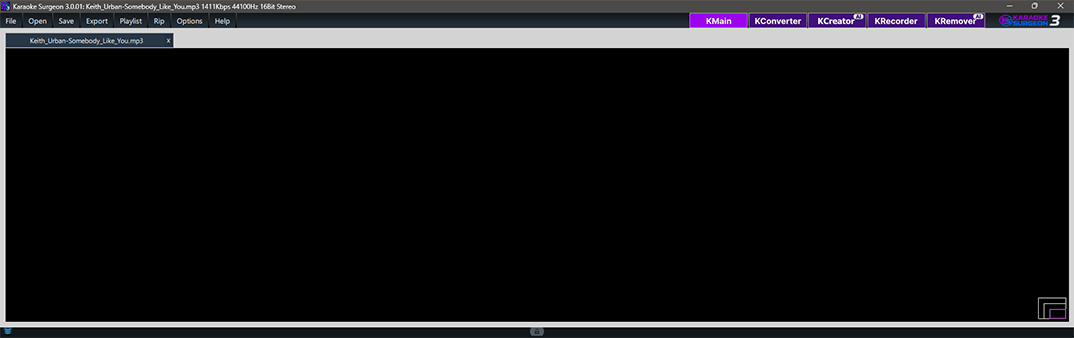
The Main Module
Shown immediately below is the Main or Editing Module. This module enables users to open and edit
existing files. Key, tempo, volume, EQ, and file length can all be changed in this module.
1
File Button
The File button at the top left of the software has the expected functionality of allowing a user to do
several different things. The submenu within the File button can be seen to the immediate right.
A. Open
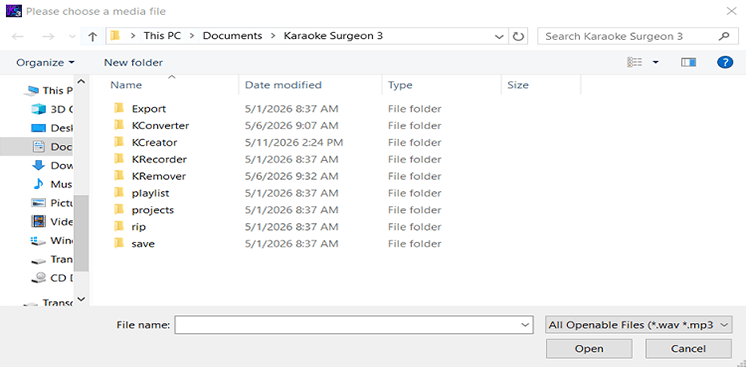
All Supported Files opens a dialog window and allows users to browse their computer to select a file.
Because it is set to ALL, it will show any/all file types which Karaoke Surgeon (KS) can open.
B. The
Open Audio Files selection changes the file type in the dialog to audio only, so only audio files will
be visible. It supports the following audio formats: mp3, aif, wav, m4a, aac, wma, mp1, mid, and cda.
C.
The Open Video Files selection changes the file type in the dialog to video formats, so only video files
will be visible from within the dialog window. It supports the following video formats: avi, mpg, mp4,
mov, wmv, and webm.
D. The Open Karaoke Files selection changes the file type in the dialog to Karaoke
formats, so only karaoke files will be visible. It supports the following karaoke formats: cdg, dat,
zip, and bin.
E. The Open Project Files - The Main Editing module has the ability to save your work
as a
project file (Section 3). The Open Project file selection here in the Files menu allows you to select a
previously saved Project file and re-open it in Karaoke Surgeon.
F. Open New Window opens another KS window on your
computer screen.
G. The Open Playlist selection opens a dialog and allows you to open a KS playlist
(.ksp) file.
H. Import Playlist allows a user to select an iTunes playlist file (.xml format) or a
Windows media playlist (wpl) file and open it within KS.
I. Rip Disk open the Ripping dialog window
within KS and allows you to rip an audio CD, a CD+G, DVD or a VCD disc. More details about this function
are available later in this document.
J. Recently Opened Files shows you a list of your recently opened
files. You can control the number of files displayed here in the Options button of the software. You can
also see recently opened files by right clicking the Open button.
K. Export and Save Changes is the same
function that is found in the Export menu at the top of the User Interface (UI). This option is
discussed in more detail in a later section of this document.
L. The last option in this File menu is
Close Program. This will close the program when selected. If you have a file open in the KS2 it will
prompt you before closing and potentially loosing your changes
2
Open Button
The Open button opens a dialog window similar to the one opened from the File menu
discussed above. By
default, the All-Openable Files are selected in this dialog window (at the bottom).
The default location
for the path shown in this dialog window can be changed in the Options button of the
program.
New to Version 3 is the ability to open up to six files at once. When more than one file is open in KS3,
the program will open tabs as shown below. Toggling between these tabs allows you to work on any of the
songs that are open.

3
Save Botton
When working on a in the Main screen of Karaoke Surgeon there are two ways to “save” your work. One is
the Save command which will save all of your onscreen settings and changes in a
Project file. This
project file can be reopened at any time. When it is, KS will reapply all of your original settings so
you can pick up where you last left off. Project files (.ksp files) are internal files used by KS3. They
are not playable or useable by any other program.
Once you have made all of the changes you need or want
to make to a file, if your objective is to embed those changes permanently in a file,
then you must use
the Export command which is the second way of “saving” your changes. This creates a new
standard A/V
which is playable in any other standard A/V player.
When you use the Save button the first time after
opening a file in KS3, it will open a dialog window and allow you to assign a name to the project file.
Thereafter any subsequent clicks of this button will simply save any changes you’ve made with that
existing file name. If for some reason, you’d like to use a different name than the one currently
assigned to this project, you may right click the Save button and you will again see
the dialog window
allowing you to assign a different name.
KS3 project files save the following parameters:
- Player handle position
- L/R channel values
- Zoom value
- Scroll value
- HQ / EHQ
- FP on/off
- Key value
- Tempo value
- Volume
- Shift audio
-
PLUS any changes made from the timeline editing menu
(copy, cut, paste, delete, change volume, etc).
4
Export Button
The Export option is used for saving changes made in KS in a new file. KS can modify the key,
tempo, EQ,
volume, file length and formants in a file or song. On Export, those changes become
permanent and are
stored in a new file. When you click the Export button, the dialog that opens will, by default, insert
the same file type and name of the file you have open. You may rename the file and select the file type
you’d like to create.
If your file has lyrics and you want to save those lyrics you will need to select
a format that does so, such as a CD+G or video format. If your file does not contain lyrics then you
should save it as a standard audio file.
5
Playlist Button
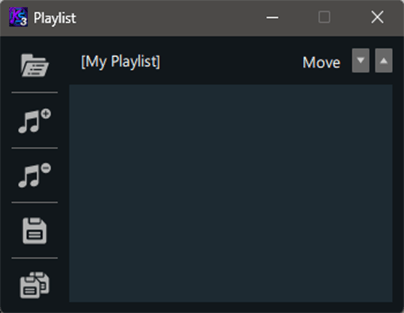
When the Playlist Button is clicked, it will open the playlist dialog has shown below. From this window
you can open a playlist, add files, delete files, save the playlist or use “save as” to save with a
different name. Lastly, clicking on a file in the playlist window and holding and dragging your mouse
will enable you to re-arrange the file order. The Playlist button opens a drop down with several
selections as shown here.
A. The Open Playlist option opens a dialog window to the default playlist folder and
allows you to select a playlist to open.
B. The Add button allows you go browse and select a file or files to add.
C. Clicking the Delete button after selecting a file or files in the playlist window
will delete those files from the playlist
D. Save As will open a window and allow you to assign a different or new name to a
playlist you have created or modified.
In addition to using the “Add” button to add songs, files can also be dragged and dropped onto this
playlist window. Lastly, files can be rearranged within a playlist by grabbing them and moving them with
your mouse.
6
Rip Button
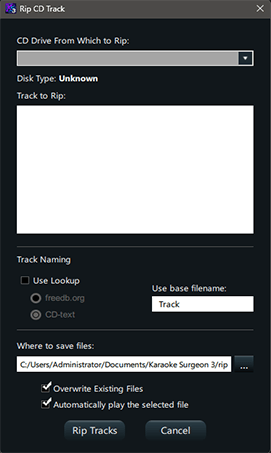
The Rip Button opens a rip dialog window that looks like what is shown on the right. The rip function in
KS allows you to rip audio CD’s, CD+G discs, VCD discs and DVD discs.
Once you open the dialog you
should select the location of your CD drive. Once done, KS will auto-detect the type of disc and prepare
to rip it.
Karaoke Surgeon will either look up the track names or use a default name. If “Use lookup” is
is selected, KS will use an online database to find the track names or read them from the CD’s metadata,
using the radio buttons.
If “Use lookup” is deselected, KS will use a placeholder label: the default is
“Track”, and KS will save files as “Track 01”, “Track 02”, and so forth.
Please note that if the list of
tracks is blank or empty, this is most likely caused by the selection of "Use Lookup" when
there are no
matches for this CD in the database. In that case please deselect "Use Lookup" and you should see a list
of tracks appear.
Once you see the track names, you select one or several. KS3 will rip ONLY the selected tracks. You can
select/deselect tracks using your mouse and Shift and/or Control keys. If no tracks are selected and you
select Rip, KS3 will rip ALL of the tracks on the Cd/DVD.
This dialog allows you to select the “Save As”
file type format from a dropdown list of formats.
The default save location is
C:/Users/User_Name/Documents/Karaoke Surgeon 3/rip/. Change the save location either by clicking the
location box and typing in a new file path, or clicking the “...” box to the right and navigating to the
correct location.
Overwrite existing files is deselected by default. If files already exist in the
chosen save location with the same name, and this option is selected, it will overwrite them with the
tracks on the current CD. For example, if a previous CD has been ripped with the default of “Track 01,
Track 02,” etc., and a new CD is saved in the same location with the same default track title, the new
tracks will replace the old ones.
Automatically play the selected file is selected by default. This
option allows you to click onto a track and hear it play. This is helpful if you don’t know which
track(s) you want to select by name, but can recognize them if you hear them.
Finally, select “Rip
Tracks” to proceed with ripping or the “Cancel ” button at the bottom of the dialog window to cancel and
close this window.
7
Option Button
Option Button ipsum dolor sit amet, consectetur adipiscing elit, sed do eiusmod tempor incididunt ut
labore et dolore magna aliqua. Quis ipsum suspendisse ultrices gravida. Risus commodo viverra maecenas
accumsan lacus vel facilisis.
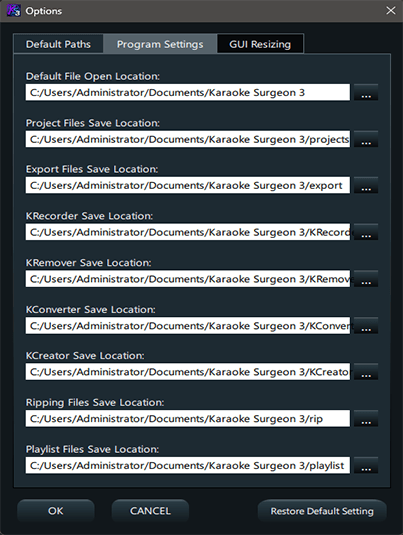
The Options Button opens the dialog window shown to the right. This window has three tabs within it. The
first tab contains Default Paths. These subfolders are created by default when the
program is installed
on your computer.
You can change these paths by editing directly on this page or you can click the
button on the far right, with three dots which will open a window and allow you to browse to select a
new location. The second tab is labeled GUI Resizing. This tab displays a dropdown field from which you
can select a different value, other than 1.0 which is default. Numbers larger than 1 will resize the
User Interface to a larger size. Numbers smaller than 1 will make the UI smaller.
Once you have selected
a value, click OK and the UI will resize immediately. If you not satisfied with the new size, select a
different value and try again. The third and final tab in this window is labeled “Other”. This tab
contains miscellaneous setting for KS that can be customized. Here is what you see when you open this
tab.
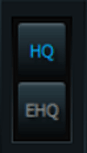
The first option is a setting for the default audio algorithm. By default, it is set to HQ. In most cases
you will want to leave it there. See Section 21 of this document for a more detailed discussion of
algorithms.
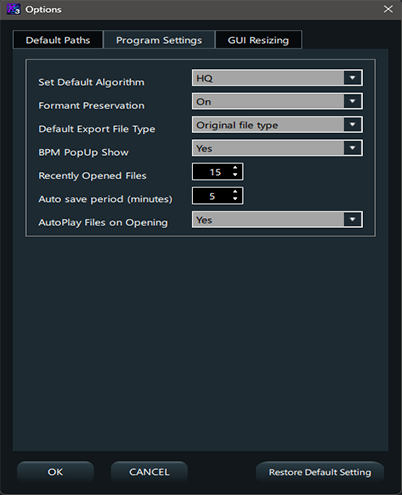
Formant preservation is by default set to off. You can change the default setting on. See
Section (#25) for a more detailed discussion of formants and when this should be
used.
If you have a
preferred file format you want or need to use when creating new files, you can set that format here. It
is blank by default, which means that on Export the dialog window will insert the same file format as
the file open in KS. If you select a format here, this file format will become the default file format
on Export that will appear in the Export dialog, though you will still be able to manually over-ride
this selection and choose an alternative format in the dialog window.
The Recently Opened Files setting
is by default set to show 15 files. You can customize this to your liking by using values between 1 and
99.
The next setting is this section is the Auto Save time period.
This is the defined time frame at which KS3 will automatically create a backup of what you have open on
the screen. By default, this is set to 5 minutes. You can customize that setting to meet your own needs
here.
The last setting, Autoplay, is the facility that plays the audio of a file when you select a file
within a dialog window, before the file opens. This allows you to preview a file and determine if it is
the one you are looking for. By default, this is selected. That means that this function will be enabled
in every dialog window that (rip, open). You can turn this off from a dialog window or you can turn it
off by default for all dialog windows by deselecting this option.
The third tab is labeled GUI Resizing.
This tab displays a dropdown field from which you can select a different value, other than 1.0 which is
default. Numbers larger than 1 will resize the User Interface to a larger size. Numbers smaller than 1
will make the UI smaller.
Once you have selected a value, click OK and the UI will resize immediately.
If you not satisfied with the new size, select a different value and try again.
8
Help Button

The Help Button of KS contains a number of selections. We’ll review these briefly one at a time.
My Account takes you to the Log-In page of your account with Karaoke Surgeon. Once logged in you can
modify your contact information, see your purchase history, get download links and also deactivate a
machine.
The Help Desk selection will take you directly to our 24/7 Help Desk.
The Training Video
selection is linked to the training videos page on KS site that contains a series of video
demonstrations of the product.
The User Guide selection in this button is linked directly to this page
that you are now reading, which is the KS3 User Guide.
Deactivate Machine is an option that will remove
the license from the machine on which KS is installed where you select that option. This is something
you should do if you want to STOP using the program on an existing machine and free up a license for an
install on a different machine.
Check For Updates will tell you if there are any updates to the current version of KS you are running.
The Show Logs option, opens the folder where these logs are stored for easy access.
The About button
will show you the current version and build of the software installed on your machine. It also displays
your machine name or identifier as used in our system (in your My Account page). It also contains other
legal and ownership information.
9
File Stats
When you open a file, KS displays here, at the very top of the UI, the file characteristics of the open
file including file type, bit rate, fps, and other file specifications.

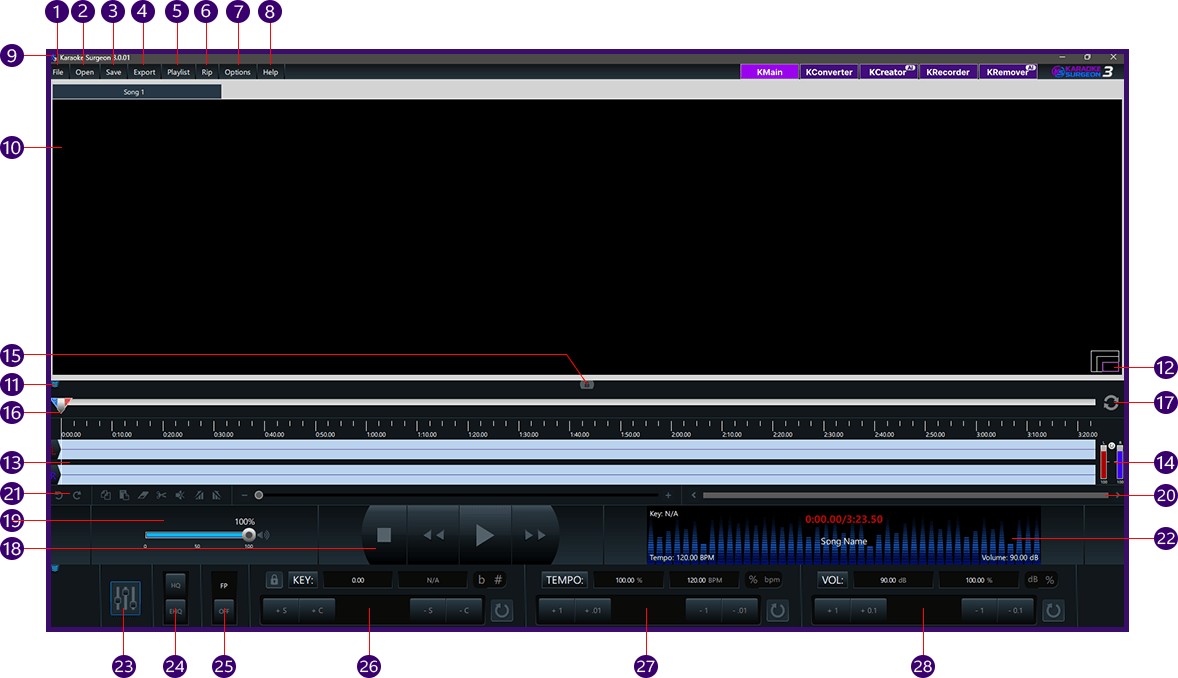
10
Collapse Button

This little button immediately below the File menu button is a collapse button. It can be found on three
different locations of the UI. This button will collapse or hide parts of the UI to provide a more
compact size. There are three of these buttons on the UI. .
11
Video/Graphics
This is the main video screen for the software. The video or Karaoke graphics will appear in this window.
If the file you have opened is an audio file, this window will remain blank. .
12
Lyrics Resize

In the bottom right corner of the video/lyrics display area there are 3 concentric rectangles as shown.
These represents the different possible sizes of lyrics to be displayed. Each click of this icon changes
the size of what you see. The smallest size is the default CD+G size. The next size is a doubling of the
smaller size. The last size is a full screen size.
13
Audio Data Graphing and Channel Switching
This is the plotted audio data for the open file. On the far left you can see the channel designations of
Left and Right. If you click either the L or the R, you will see the color of this text change and you
will also see the data in L/R channel change. Anytime you see the color of the L or R channel label a
different color than the channel data, you know the channel data has been switched. Simply click the L
or R text symbol again to switch it back.

14
Audio Channel Sliders
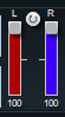
On the right side of the channel data are two small channel sliders. These sliders control the volume
sent to each channel. By default, they are both set to 100% but can be adjusted as desired. These
channel sliders are integrated with the pre-amp sliders found in the EQ which controls the levels.
15
AV Sync Icon

The small semi-transparent icon in the middle of the screen just above the slider and below the video
window is a A/V sync button. This button, when clicked, opens a utility that allows users to move the
audio right or left to synchronize it with the video, if not synchronized.
16
Progress Indicator/Selection

This area of the UI is the progress indicator. The thumb shows the relative playback progress of the file
that is opens in the program. Nested against this progress indicator are the left and right-hand
selection tool handles which are used when editing. This will be discussed in more detail in the Editing
Section.
17
Replay Button Tool

This circular arrow at the right-hand side of the progress indicator is a replay button. When selected,
or On, it is highlighted in blue, when off it is in the default gray state.
18
Playback Controls

The playback controls consist of the following items. On the left is the Stop button. In the center is a
forward arrow which is a play button. When clicked, it starts the song playing and then toggles to a
light blue pause button. If clicked again the song is paused at its current playback position. The
double arrows left and right of the center Play/Pause button are Fast Foward and Fast Rewind arrows.
With each click they move in 5 second increments.
19
Volume Control (Playback)
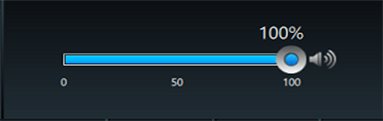
To the left of the above playback controls is the volume slider. This slider controls the volume of the
file that is playing. On the right had side of the slide is a volume symbol which, if clicked, changes
in shape and color and mutes the song completely.
20
File/Song Data Display
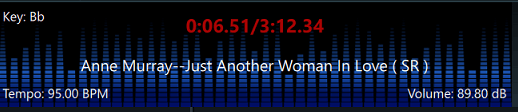
To the right of the playback controls is the Display area which shows useful data about the currently
loaded and playing file. In this display window KS3 shows the detected key, tempo, and volume of the
file. It also shows the file or song name and it shows the current playback position and the length of
the file.
21
Timeline Editing Menu
The next area on the UI is the Editing menu. To use these editing functions, you must
first select a
section of the file using the Blue and Red Selection Tool handles. To select a portion of the file, grab
the left (blue) and right (red) handles and slide them to encompass a specific part of the timeline
which is to be edited. A description of the Editing functions follow:
A. The first two circular arrows are undo and redo buttons
B. The next item is a copy icon or button.
Clicking it makes a copy of the selected area of the timeline and saves on your clipboard for pasting in
a different location
C. The next button is the Paste button. When clicked it will paste the data previously
copied to the
timeline. When clicked you will see three options. Paste at the beginning, end, or at the current
position (where the progress indicator is located).
D. The next button is the erase or delete button. It
will delete the selected area from the timeline.
E. The scissors button which follows is the cut button.
It is similar to copy button in that when selected it will copy the section of the data selected for
pasting. It is different in that when the paste button is selected the selected data is deleted from the
original location and pasted in the new location.
F. The last item is the volume/silence change button.
When clicked, you’ll see a submenu with four options. You can insert silence, silence a selected area,
reduce the volume of a selected area.
22
Timeline and Video/Graphics Zoom Sliders
The next two items to the right of this Edit Toolbar are sliders. The first one is zoom that zooms the
timeline area to assist in the precise placement or setting of the selection tool for editing. The
second slider is a timeline navigation slider. By dragging it left or right, no matter what the zoom
level is, users can quickly navigate and see the entire timeline.

23
31 Band EQ
Next, we’ll review the bottom Controls and Affects section of this main Editing Module, starting from the
left and working to the right. The button on the far left showing the sliders is for opening the 31 band
EQ.
With a thirty-one-band graphic equalizer, each band covers one third of an octave. You can work this
out from the fact that one octave represents a doubling - or, going the other way, halving - of
frequency, and there are ten octaves between 20Hz and 20kHz.
This EQ configuration provides a great deal of control over frequencies and therefore over the sound you
hear. This sophisticated EQ configuration is very useful to musicians or people that transcribe music,
as it allows them to diminish unwanted sounds and to enhance others.
When you click this graphic, the EQ
will open and it should work something like this.
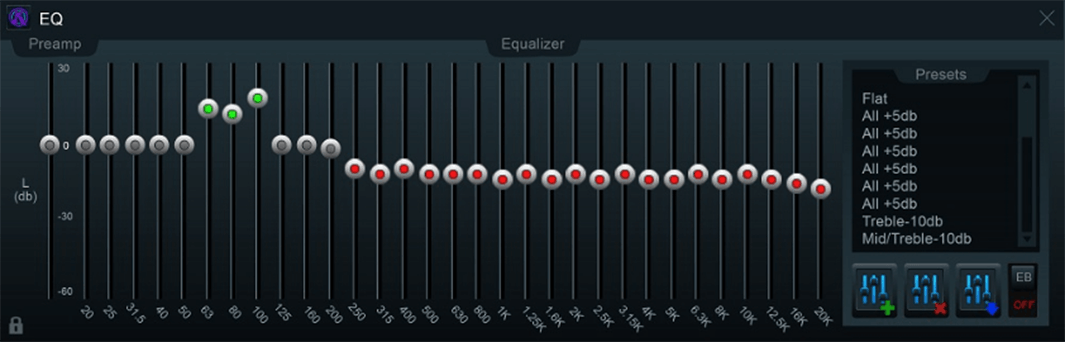
The preamp band is at the far left by itself. Use this to adjust the preamp volume. Below the preamp
band, at the bottom left of the Equalizer window, there is a lock icon; click the lock to separate the
equalizers for the left and right channels. By default, the two channels are locked together. Any
adjustments made while locked will be made to both channels of data simultaneously. Please note that
this lock/unlock feature applies only to the EQ bands, it does not apply to the pre-amp sliders. The EQ
bands can be adjusted in any of four ways:
A. Click onto and drag a slider with your mouse to move it up
or down.
B. Right-click in the track, above or below a slider, and the slider will snap to the cursor
position.
C. Right-click in the black area between any two slider grooves and release. Then move your
mouse left and right or up and down, and you will see the EQ bands follow the movement of your mouse.
This is an easy way to adjust multiple bands very quickly. Right click again, in the black area between
the slider grooves, and this functionality will be deactivated and the EQ bands will remain where you
placed them.
D. Hold the control key down, and click on a band or a group of bands; then use the up/down
arrow keys to adjust the group.
For ease of use, the EQ bands are color-coded; the default position is
gray. When a band is set above zero (0) the adjustment slider turns green, and when any band is set
below default the slider turns red. At the right of the EQ window is a preset menu, which can be used to
select from a range of preset EQ options. Click on any of the options to use it. When you do, you’ll see
the 31 bands adjust to display the settings for the selected preset.
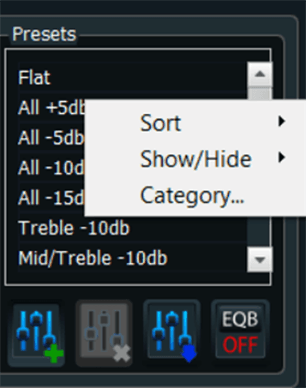
The three buttons at the bottom, right edge of the EQ window are used to modify EQ settings. When a
desired setting is reached, use the top, green checkmark button to save a preset. Use the middle button,
with a red X, to delete a preset; use the bottom button to modify an existing preset. Default presets
cannot be deleted or modified.
It is important to note that EQ is applied to the entire audio file. Any
EQ settings applied to a file open in KS can be heard in real time. When the Export command is used and
a new file is created, EQ changes will be applied to this new file.
The last area to review regards the
presets. System presets cannot be modified or erased. However, you can create new presets based upon the
existing ones by selecting a preset, modifying it to meet your needs, and then saving it with a new
name. To create a new preset, you click the button with the green + sign, give it a name, and the click
okay -- this will create a new preset.
If you want to save this new preset permanently so that it stays in the list of presets, you must click
the button with the BLUE arrow to save it. The delete button will allow you to delete ANY custom preset,
but it will NOT allow you to delete System presets.
If you right click in this preset area, you will see
some additional selection appear. These selections will enable you to sort the list, or filter the list,
so that you can get the group of presets on your screen that you would like to use. To refine your list
further, you can also use the hide/view button to hide or remove presets from the visible list. Once you
have refined your list of presets, you will need to click the SAVE button (blue arrow) to save this list
of presets so it loads the next time you open KS.
Lastly, we will discuss the EQ-B button on the far
right (which is the EQ bypass button). If you have a song open and playing in KS and you have EQ applied
to it, selecting the EQ Bypass and toggling it ON will ignore the currently applied EQ and the song will
continue playback with no EQ applied. Note that when you do this, the buttons become blue and
inactive/you can't move them. When you toggle the bypass off, the EQ is again applied to the file and
the buttons are re-activated.
24
Audio Quality Settings
To the right of the playback controls is the Display area which shows useful data about the currently
loaded and playing file. In this display window KS3 shows the detected key, tempo, and volume of the
file. It also shows the file or song name and it shows the current playback position and the length of
the file.
25
Formant Preservation
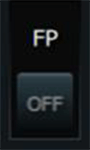
FP stands for formant preservation. Formants is a technical term used by audio engineers. For our
purposes here, the FP switch eliminates or at least reduces significantly the chipmunk or munchkin sound
that is created when the key of a song is changed that which has vocals. FP is turned off by default,
however if you are working with a song that has vocals or background vocals and are changing the key
more than ½ step you should turn the FP switch on to preserve the formants and eliminate these unwanted
vocal artifacts. If formant preservation is turned on it will be applied to the file as it is being
exported, preserving the formants, so the new file will sound exactly like it did when played in the KS
before exporting it.
26
Key Module
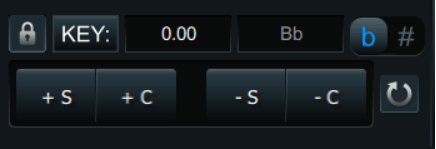
When a file is opened, KS will automatically detect and display the key. Using the flat/sharp buttons you
can select to have key shown as a sharp or a flat. If you think the detected key is incorrect and would
like to change it, you can click the padlock to unlock the detected key. After that a different key
value can be selected and the lock then clicked to lock the module with this new key.
The key area of the UI has two settings. The first is labeled + /- S for changing the key by a semitone
or ½ step at a time. The second button is for cents. This will change the key of a song by 1/100th of a
semitone. As you change the key of the song you will hear it immediately, in real time. Note that the
change of a cent or several cents is such a small change that most people cannot hear the change. As you
change the key, this module will show you what the current change is. For example, 1.12 means a change
of 1 semitone and 12 cents is being applied. Also, as you change the key in semitones, KS will change
the detected key correspondingly and you will hear this change in real time when the song is played. The
circular arrow found in this area is a rest and returns the key of the song to its “0” or no key change.
Any key change that is made in the program can be made permanent by using the Export function to create
a new file.
27
Tempo Module
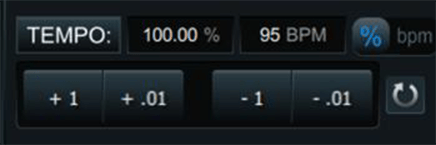
On opening a file, KS3 automatically will detect and display the tempo. It will be necessary in some
cases, because it does not know the time signature of a song, to ask you which of two possible tempo’s
you’d like to use. KS3 displays the tempo in both BPM’s and as a percentage. By definition, when a file
is opened the detected BPM of a song is 100%.
The controls in this area allow you to change the song either in units of BPM or percentage by selecting
the units you’d like to use. The selected unit is highlighted in blue. Like key, as a song is playing
and you make any change in tempo you will hear it in real time, and as changes are made, they will be
shown here in this module. The circular arrow found in this area is a reset and returns the tempo of the
song to its default or 100%. Any tempo change that is made in the program can be made permanent by using
the Export function to create a new file.
28
Volume Module
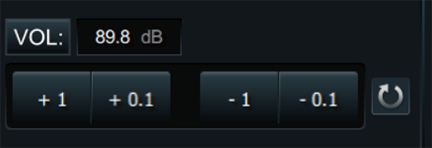
At the far-right side of this bottom area is the Volume module. When a file is opened, KS will detect and
display the volume of the song in DB. Unlike the volume slider next to the playback controls which
changes the volume only for playback purposes, changes made in this module, will be applied to the song
permanently after Exporting.
As shown in the associated picture, volume can be increased or decreased by either 1 Db or 0.1 Db at a
time. As you change the volume you will hear the volume change in real time as the song is played ---
assuming you keep the playback volume slider at some constant volume. Any changes made to volume will be
permanent when the Export command is used to create a new file. A couple of important points need to be
made concerning this module. The first is that a 10 Db change is approximately a doubling or halving of
the volume. This is an important reference point for you to keep in mind. Secondly, if volume is
increased too much distortion will be introduced and this cannot be removed once it is saved in a new
file. While there is no common value at which a song will “clip” and distortion will be introduced,
generally speaking this most often happens between 90-100 Db. Therefore, if your song is already in this
Db range, be very, very cautious about increasing the volume.
29
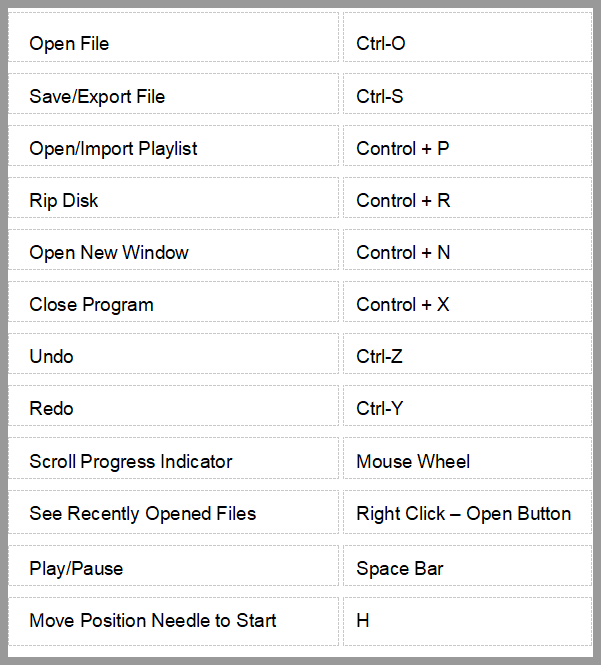
Keyboard Shortcuts
The main Editing Module of Karaoke Surgeon employs a number of keyboard shortcuts to simplify the
operation of the software. Please review the list below and familiarize yourself with them.
Module 2: KRemover Module
The KRemover module in Version 3 is fully integrated into KS3. It greatly
improves your workflow and convenience. Moreover, Version 3 uses a second-generation algorithm which
yields much better-quality vocal removal.
The KRemover is also available as a web-based tool on the
Karaoke Surgeon website and can be found here: https://karaokesurgeon.com/vocal-removal-tool/
To begin
using the KCreator, you must first have the song open for which you’d like to remove or isolate the
vocals. If you have multiple songs or tabs open, KCreator will process the song in the active tab.
In
the screenshot of KCreator nearby, the song “Making Love” is queued for processing. However as shown,
there is a dropdown list which means that you have more than one tab/song open. This allows you to
select one of the other songs if the default is not the one you want.
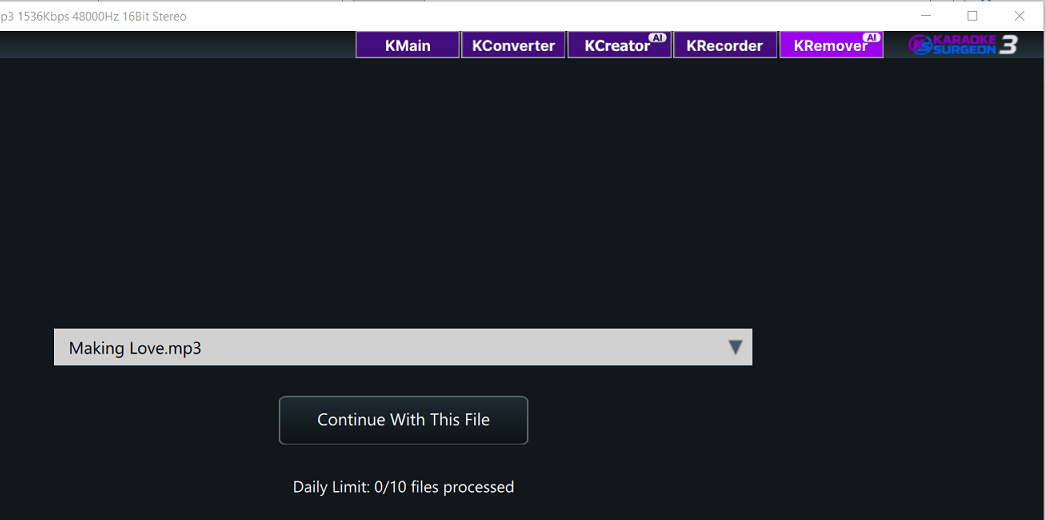
Once you confirm the song you want to process, click the “Continue With This File” button and KCreator
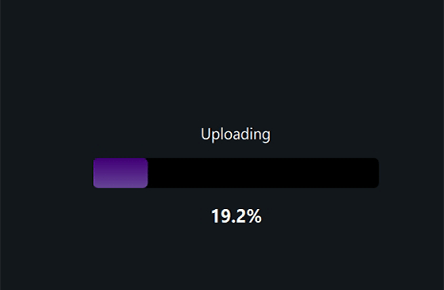
uploads the selected file to our VRII Server.
As it does, you will see this progress indicator.
As it is processing you will see this on-screen timer
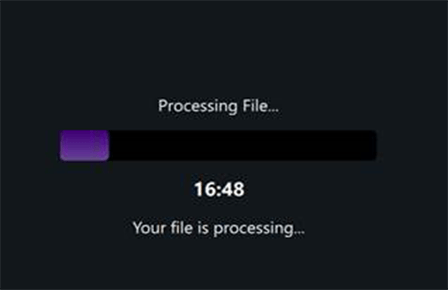
The processing time is largely dependent upon the song length and can take a few minutes. Within KS3
you have two subscription options:
Premium Plan – Limited to 3 files/day,
and a maximum of 15/month
Pro
Plan – Limits of 5 files/day or 25/month
Platinum
Plan – Limits of 10 files/day or 45/month
. Platinum and Pro runs on
a GPU server and also processes 3X faster the Premium Plan
Once the file has been processed, our VRII server will send two stems of the processed song back to
KS3: a Vocals Only stem and the Entire Mix without the vocals. Once these files are downloaded, they
are automatically opened in Karaoke Surgeon and when complete you will see THREE open tabs in KS3,
the Original song and the two two processed stems. An example of this can be seen below.

With these three tabs open you can toggle between them and play the different stems to easily hear
how each sounds.
The two stems that were downloaded are automatically saved for you in this default
location on your machine:
C:\Users\*USER NAME*\Documents\Karaoke Surgeon 3\KRemover
Module 3: KRecorder Module
The third module found in Karaoke Surgeon is the KRecorder module. This module allows you to sing and
record your voice to a backing track. This track can be either a simple audio file, a CD+G file, or a
video file. This is a basic recording module for sharing, it is not a sophisticated, professional
recording system. When your recording is finished you can save it either as an audio file or as a video
file. If you plan to upload to YouTube or other video sharing sites, you’ll obviously need a video. If
you use an audio only backing track and want to save as a video, you can upload a picture or image that
KS will use in creating the video. If you don’t upload an image, KS will use a stock Karaoke Surgeon 3
thumbnail from which to create a video. Before the KRecorder button can be used a file must be loaded
and opened in the main UI. Once that is done, you can click the KRecorder module and it will open and
load that file into the KRecorder module, and if it is a video or CD+G it will display the lyrics as
shown in the nearby example.
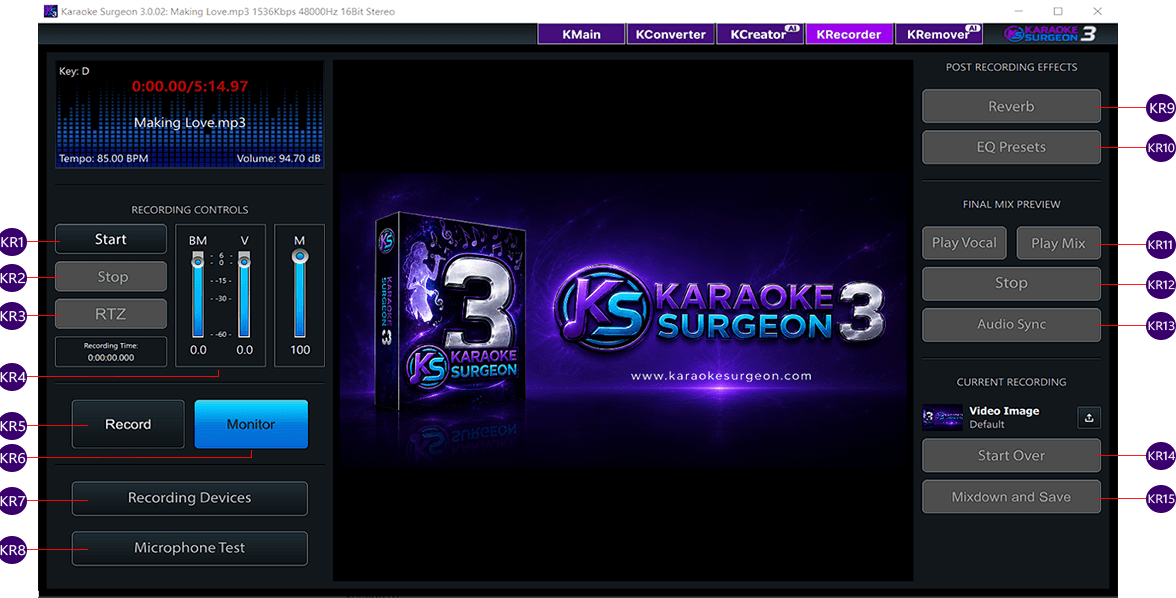
The controls on the left are for set up and recording. The right side contains post-recording controls.
Let’s review the controls for this module starting on the left side. The Start button
(KR1) at the top
starts the loaded file playing. If the Monitor button (KR6) is selected you will hear
this file play. If
the Record button (KR5) is selected, not only will you hear the file play but anything
you sing will
also be recorded at the same time. The Stop button (KR2) stops the file in its current position. When
you click Start again it will resume either Recording or Monitoring from that point moving forward.
RTZ
(KR3) is a common button in a DAW work station. This stands for Return to Zero. When you
click this
button the entire file rewinds to zero. If you previously recorded your voice along with the background
music and you click Monitor button, you’ll hear your voice paired with the background music. If the
Record button is active and you click the start button then you’ll record over top what you previously
recorded and loose that data. To be clear, when Record is selected, and you click Start it will record
the background music and whatever addition audio input there may be from your microphone. If the Monitor
button is selected this means that Record is disabled and you will hear the background music paired with
ANY audio previously recorded through your microphone.
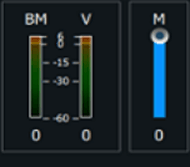
There are three sliders (KR4) that can be adjusted. These are shown to the right. The BM track
stands for
Background Music. The V stand for Voice and the M stands for Master.
Near the bottom on the left-hand side is the Recording Devices button (KR7). When
clicked it will open your system audio settings and show you what recording devices you have installed
on your machine. If you have more than one, you should select the one you want to use for KRecorder. You
should also disable the others temporarily so you don’t generate distortion by two recording devices
recording the same audio at the same time.

In Windows you do this by right clicking on the devices in this window and then selecting disable. When
you close the KRecorder Module, KRecorder will return your audio recording devices to the way they were
before you started recording, meaning it will enable any devices you disabled prior to recording.
Here are the steps for recording.
1. During the pre-recording setup you should click Monitor and then
click the Start button and listen to the Background Music and adjust the volume to a volume you are
comfortable hearing when you sing along with it. Some singers prefer to have the background music
relatively low, so they can more easily hear themselves sing. Others prefer to have the BM louder and
about the same volume as their voice.
2. Unlike the pre-recorded BM your vocals are not recorded so you
cannot play adjust the vocals using the V slider. To set up the mic recording volume, select the
Microphone Test (KR8) button at the bottom. This will then replace the BM/V sliders
with a L/R channel
meter and with a slider that adjust the microphone level. Talk or sing into your Mic at the normal level
you will be singing and watch the meters. Your goal is to have the volume between -15 and -5 Db. Adjust
the Mic volume slider to achieve this. Click the Microphone Test button a second time to deselect.
3.
Once you have set these two levels you are now ready to record. When you are recording and singing into
a microphone, whether this is an internal mic found on your PC or a separate external Mic which you
attach, you should always listen to the background music through a headset. The reason
is simple. If it
plays through your computer’s speakers, you microphone will record not only your voice but the
background music playing through your speakers. By using a headset, you prevent this from happening.
4.
Click the Record button and sing the vocal track as the background music plays. If you make a mistake
and want to restart, simply click the Stop button then RTZ and then start singing again. Once you have
completed the singing of the vocal track click the Stop button – then RTZ.
5. You next step is to adjust
the volumes in the mix. To do this click the Monitor button and then click the Start button. You will
now hear the BM paired with your vocals. As this recording plays back, you can adjust the BM or the
Vocal slider up or down to increase/decrease the respective volumes until you achieve the best balance
possible. Because of potential clipping (loudness causing distortion) in most cases it is better to
reduce the volume below 0 rather than increase it above 0 Db. Increasing it above 0 Db can cause
clipping. Please note the slider volume for BM and V you set applies to the entire length of the
recording. You cannot apply a different level to a different segment of the recording.
Post Recording
Next, we move to the right-hand side and the post-recording Controls and Tools. These effects are applied
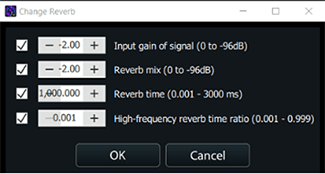
ONLY to the vocal you have recorded. Reverb (KR9) is an “echo” effect that can be
applied to a recording. It is often used during the mixing process. We'd suggest as a starting point
that you use the default values supplied. You can do this by simply checking the four checkboxes.
Applying reverb adds substantial volume. To offset this volume, you will need to reduce the sound in
these first two parameters: input gain and reverb mix. We suggest you start with values of -2 Db and
then adjust from there as necessary.

EQ Presets (KR10) – Equalization is the process by which you increase or decrease
specific frequencies within an audio file to change how it sounds. KRecorder comes loaded with more than
60 presets that have been custom-built on an instrument basis. However, by default we are only showing
the pre-sets for vocals and for some other basic EQ changes. If you’d like to see the other presets,
right click while in the list of presets and you’ll see these options from which you can choose to show
other choices. The list of vocals presets is not comprehensive and even those presets provide may
require some additional tweaking for each vocal track. Nonetheless, these EQ presets are helpful
starting points.
Final Mix Preview
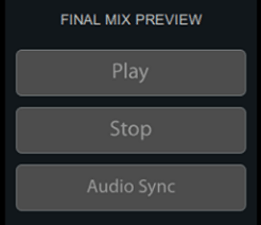
In the Final Mix preview section, you can hear the Reverb and or EQ you have applied. Click the play
button (KR11) to hear the mix play with your effects applied. Click it again to pause it
and then click
the Stop button (KR12) to return to the beginning. The third button Audio Sync
(KR13) allows you to sync
your vocals with the background music. It most cases this isn’t necessary but we have encountered a few
machines where there is some latency in the recording which cause the background music to be out of sync
with the vocals. This feature allows you to change the position of the audio of the vocal channel by
moving it forward or backward to sync it with the background music.
Current Recording
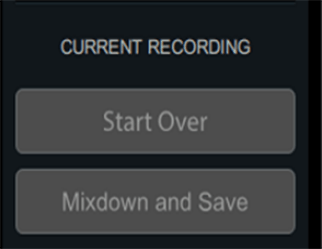
The last section contains 3 items. The first is of the default KS3 video frame that will be used a video
is being created from an audio file. Alternatively, you can click the upload button and upload and use
your own image file. The next item is the “Start Over” button (KR14). It deletes the
current vocal
recording. The second button here is to mixdown and save (KR15). When clicked this button opens a dialog
window in from which you assign a name to this new file that will be created. You will also select
whether you want to create an audio or video file. If the background music used for the recording is
from an audio file, and you choose the option to create a video, KRecorder will create a video using a
single image which is a KS3 graphics. If the background music file was a video or CD+G and you choose to
create a video, the video will use this the graphics contained in this original files. If you select an
audio file format, no graphics will be used and KS3 will create an audio file.
Module 4: KConverter Module
KConverter is a bulk file converter that can convert 1, 100, or thousands of files at a time. The
interface for this module is shown below.
You can add files to this module by either dragging and
dropping them on the interface or you can click the Browse Files button in the upper right
and navigate
to a location to select files.
If you would like to include ALL of the files in a subfolder, tick the
checkbox in the upper right to do this BEFORE you select the Browe Files button.
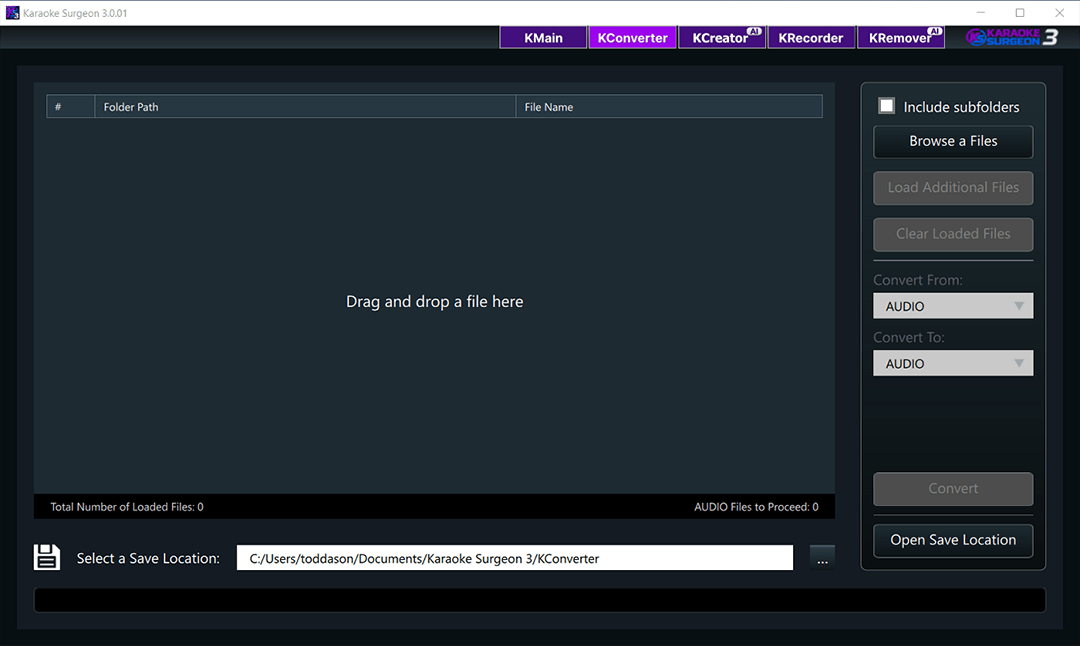
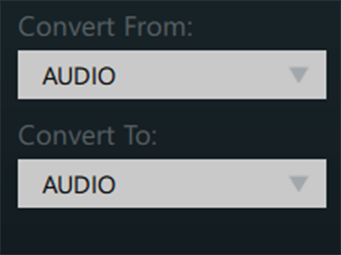
Once you have added the files you’d like to convert, select the Convert From format. It
can be All or it
could be a specific file format. KConverter will show the number of files of the specific format you
have selected.
You can select to process a single file format, or an entire file format group. You can
use your shift and control keys to select specific files from within the list of files
shown in the main
files area.
Once you have selected the Convert From format, you next select the Convert To format.
The
list of choices in this drop down are dictate by the format you are converter from. For example, if you
select audio files or mp3 files in the Convert From drop down, you cannot select Video or mp4 in the
Convert To list.
Once you have loaded the files and made your selections, click the Convert button and
KConverter will process the files that have been selected.
While processing if you click the Stop button it will abort the process. If you click
Pause, it will
pause the conversion which allows you to return at a later time to unpause it and continue processing
where you left off.
When the processing is done, KConverter will open a log file showing you the results. If there were
problems with some files that could not be converted you will see that in the log files.
Also
note that there are some conversions that KConverter cannot do. For example, video files CANNOT be
converted to CDG files but CDG files can be converted to video files. Also, for the present time,
KConverter cannot convert .bin file.
Module 5: KCreator Module
The backend of the KCreator module was completely designed in KS3 and is powered by AI which will enable
you to create or author a karaoke file in 10 minutes rather than an hour or longer.
STEP 1 of the KCreator module is shown below. In this step you will open either a
previously save KCreator project file (.kcpr) or you will open a multi-track mixed audio file with
vocals for which you want to create a karaoke file. You can either drag drop the file onto the interface
or you can click the button to browse and select a file.
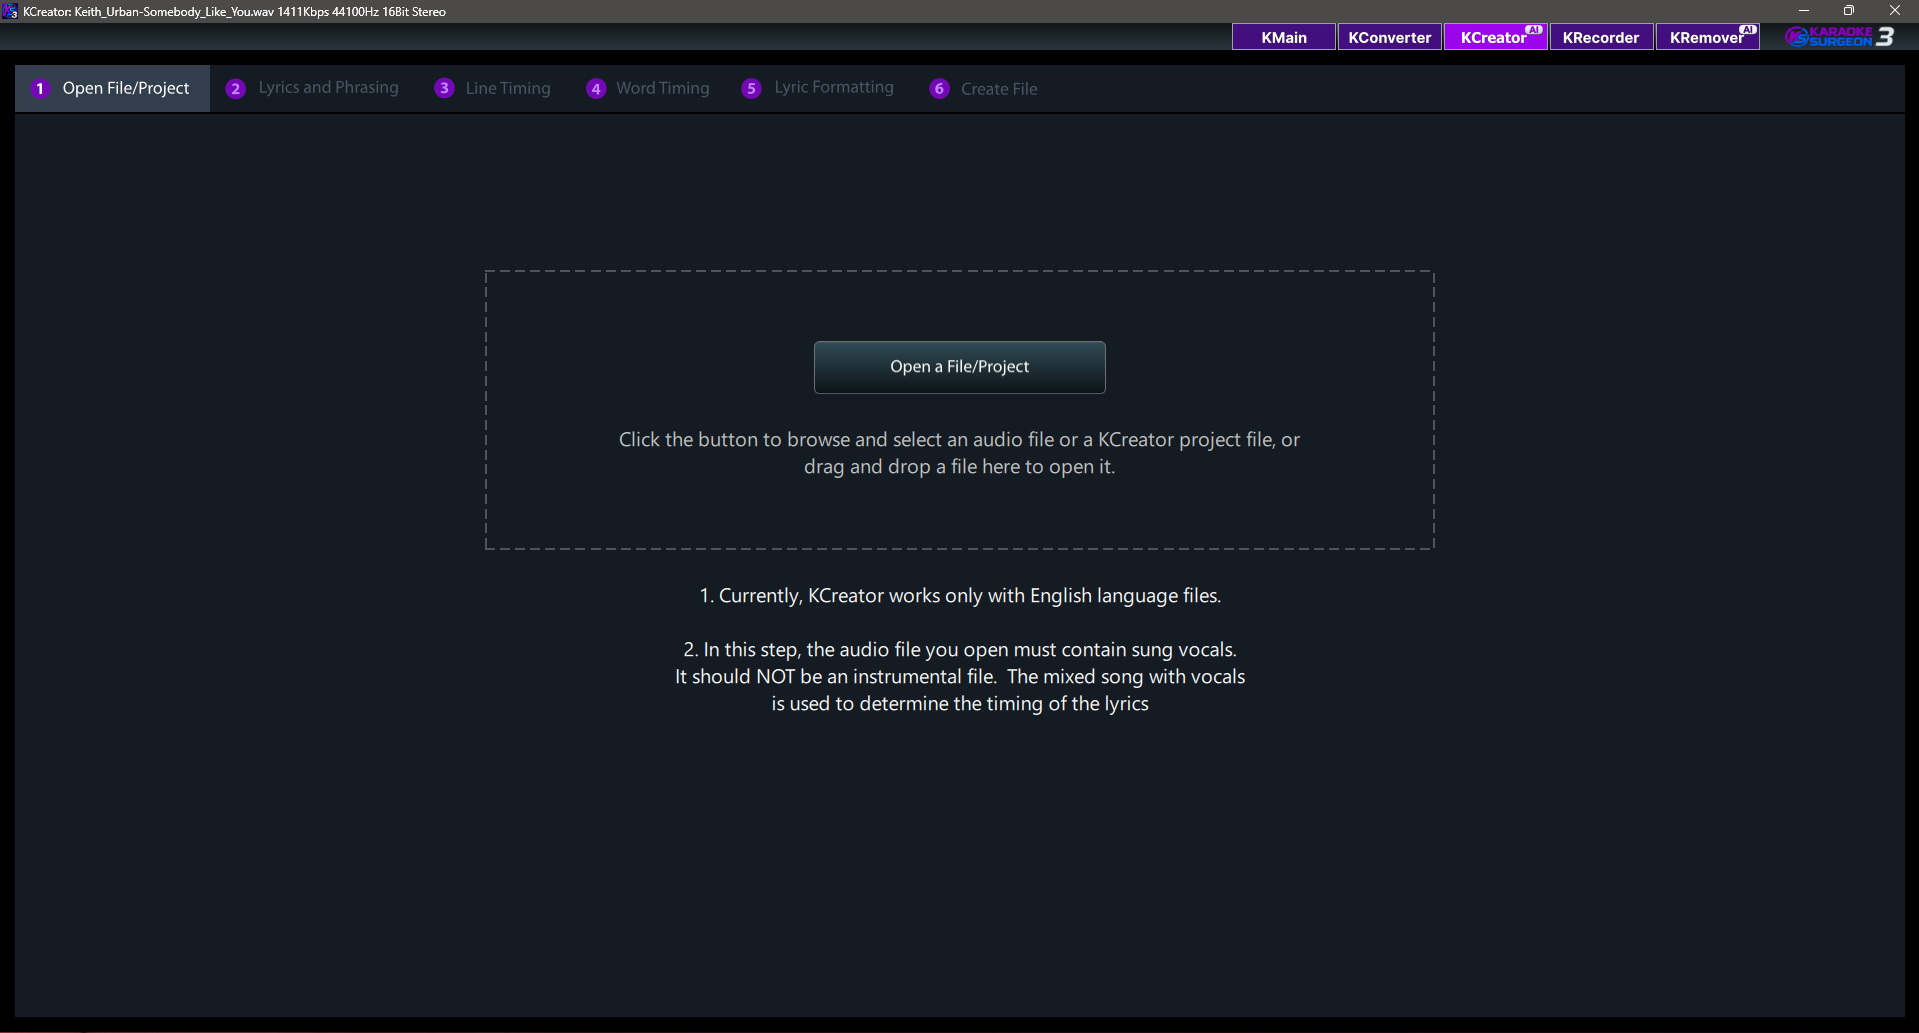
If you are opening an audio file, as soon as it is added, KCreator will try to find lyrics for this song.
If it is successful, it will automatically open Step 2 where you will see the lyrics.
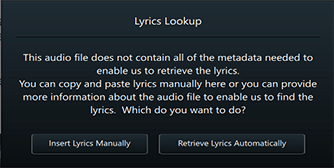
If KCreator cannot find the lyrics it will return the following dialog window. In most cases, this is
because the meta-data normally encoded with the file is missing. To try again, click the button that
says “Retrieve Lyrics Automatically” and then supply the additional information requested and KCreator
will try again. Alternatively, click the button to Insert Lyrics Manually.
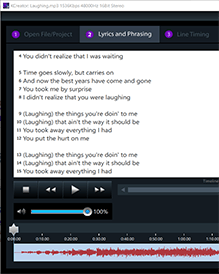
Regardless of which option you choose, you will be taken to Step 2. In the graphic
nearby you can see a
portion of the Step window containing the lyrics.
It is CRITICAL that the lyrics are exactly correct for the automatic detection of timing (which will take
place in Step 3) to be correct.
If KCreator found the lyrics automatically it is likely they are correct. However, if you typed them or
copied and pasted them, there is a greater possibility of error. We strongly recommend in this second
case that you click the Play Button at the bottom and read the lyrics as you listen to the song. If any
of the lyrics are incorrect, please fix them before proceeding.
Next, we move to Step 3 which you can see below. Click the text in the purple strip to
have KCreator’s AI
powered system automatically detect the word timing.
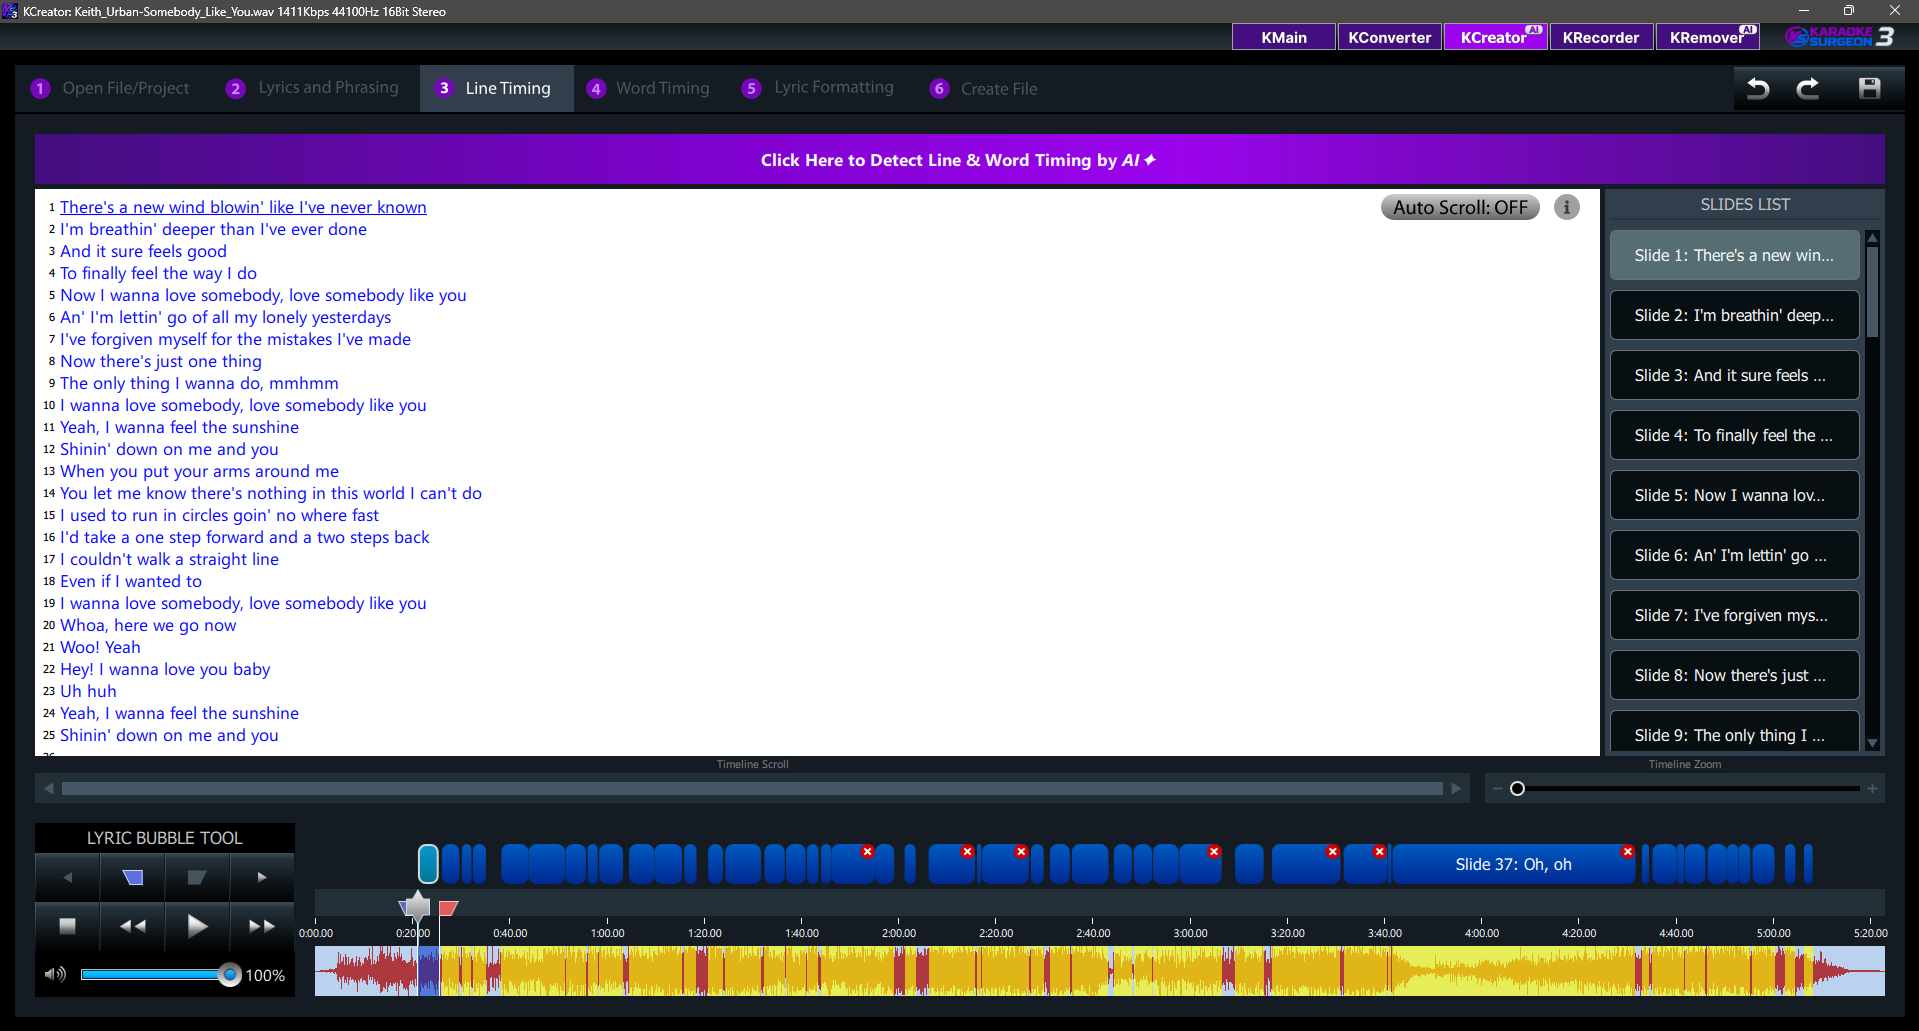
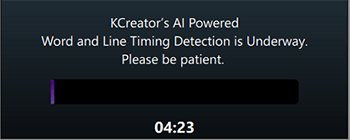
When you do, you will see a progress indicator as KCreator uploads your file to our server and then a
second Dialog window showing the estimated processing time, the Step 3 UI will be
grayed out (inactive)
while this task is being performed.
Once the processing is complete, you will see Word Bubbles at the bottom of this screen, just above the
plotted audio data as can be seen in the nearby image. In addition, a dialog window is shown prompting
you to “Review The Timing”. Though not a requirement, we encourage you to do this because if the timing
is off, you should go back and check the accuracy of the lyrics and run this again.

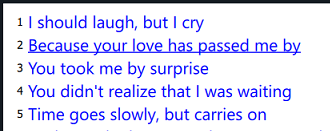
When you click the Review Timing button the window dis-appear and you can now access the play button at
the bottom left. As the song plays, the text lyrics will be underline, allow you to check the
synchronization.
If the timing is incorrect, you have two choices
1. Go back to Step 2 and recheck the lyrics. Also confirm that the song you uploaded is the original one
by the artist, not some alternative version. Fix one or both of these items
2. You second alternative it
to manually change the timing by listening and adjusting the bubble size at the bottom of Step 3. Step 3
bubbles are for word-by-word timing. In Step 4, the bubbles are for line timing. If you need precise
timing you should fix in Step 3. If you don’t need word by word timing but and can live with line timing
then edit the timing in Step 4.
Once the timing is correct, whether you are in Step 3 or Step 4, proceed
to Step 5 which is shown below.
Step 5. Lyrics Formatting and File Settings
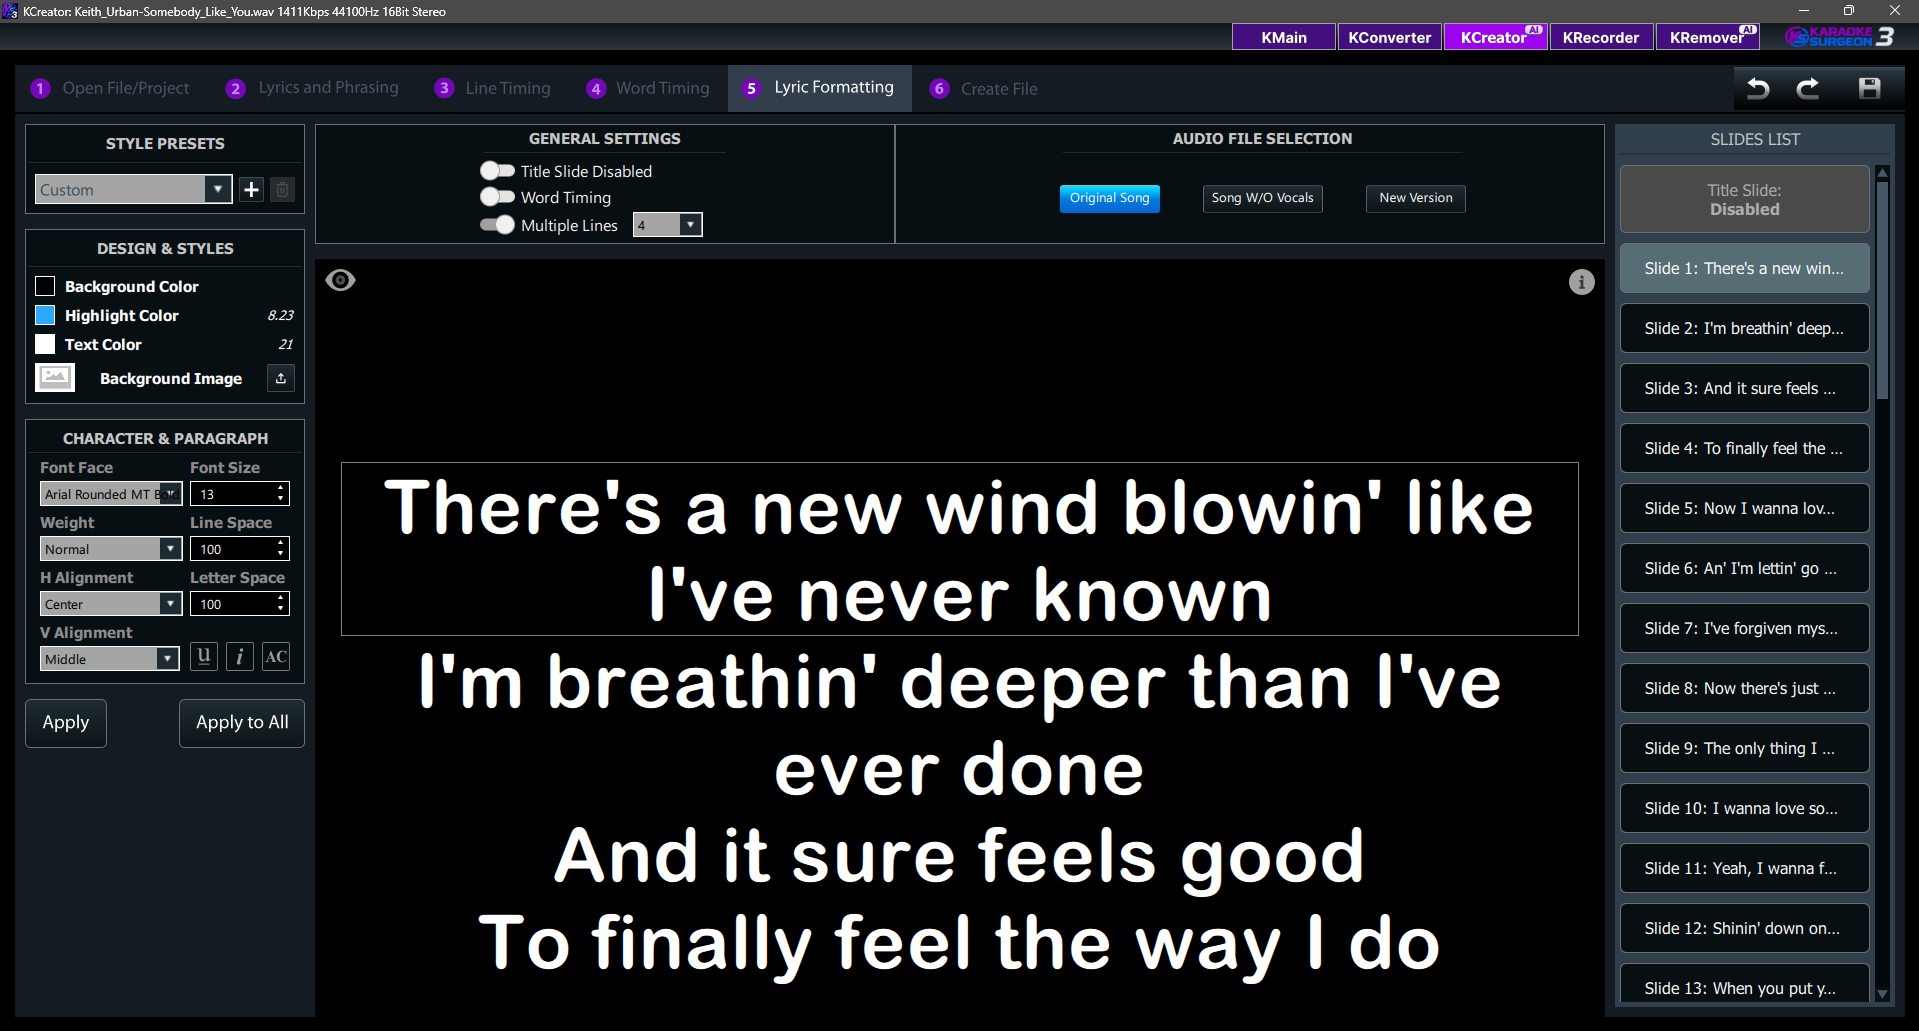
In this 5th tab of KCreator you can do the following:
1. Set the background color, the font style, size
and color, and text highlighting color
2. Choose the Karaoke Song settings
a. Choose if you want a
title
slide
b. Select Word timing or Line timing
c. Select the number of lines/slide to show.
3.
Select which
audio file you want to use when the Karaoke file is created
4. Set the characteristics found in our
Title Slide
Each of these 4 items is discussed below starting with the font size, style and other
characteristics.The first slide is selected automatically when you move to this step. It appears in the
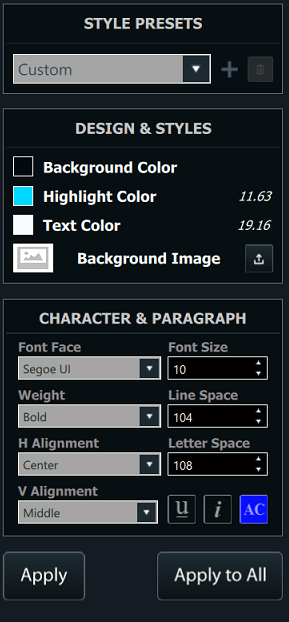
main work area. At the top left of this screen, under Style Presets you can choose from a number of
preset designs. You can also create and save your own. Using the controls on the left you can change and
select the font style you’d like. As you do, these changes will appear in the center work screen. Please
note the number values in the Highlight and Text Color Selectors. These are color contrast ratios. These
values can be used to determine whether your selection of colors will be easy or difficult to see in the
finished file.
Poor Contrast (Difficult to see): Below 4.5
Medium Contrast: 4.5-7
High Contrast (Easier to see): Above 7
Note that immediately below the Text Color selection area, there is a Background Image Label. If you’d
like to use an image file on one or more the slides you can use it by clicking the Upload icon to the
right of the Background text label. Once you have the design or layout you want select the Apply button
at the bottom left to apply this to the slide. If you want to use the same color scheme and layout for
all slides – which is common in karaoke files – select Apply All. You can also apply the layout of a
slide to selected sides. The first slide you select will be the design applied, then while holding the
shift key down, select the additional slides on the far right, you want to apply this style to. When you
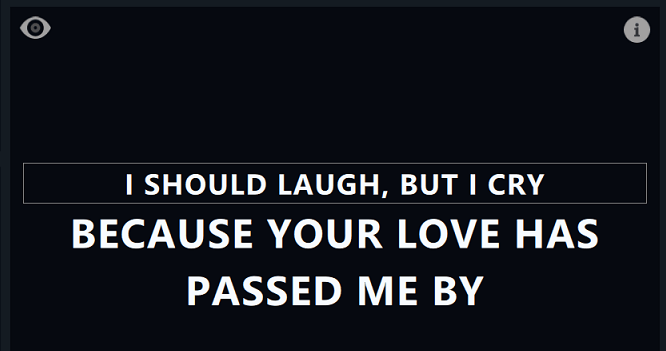
are done, select Apply and it will apply this same design to all selected To preview what this will look
when you play the karaoke file select the Eye icon which you see next to the mouse in the graphic to the
left. When selected, KS will ask you if you’d like to preview the Entire Song or just the selected
frames or slides. Select your choice and KS will generate a preview file and then play it for you on the
screen.
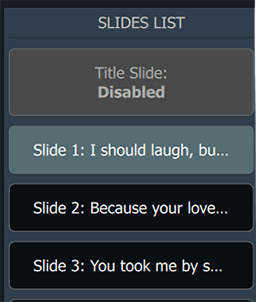
At the top center of the screen are two more settings to review. The General Settings are as follows:
Title Slide Toggle – This option either disables or enables the use and creation of a
title slide. When
enabled the title slide can be customized as discussed in the next section.
Word Timing – When enabled,
the shading of the song lyrics is done, word by word. If it is disabled the timing is done, line by
line.
Multiple Lines – This setting controls how many lines of lyrics appear on the screen at
a
time.

To the right is an area to select the audio file you will use for the creation of your karaoke file. They
are:
Original Song – This is the multi-instrument song with vocals you uploaded in step or
Tab 1 of
KCreator.
Song W/O Vocals – This is the Original Song you uploaded but without the vocals, using
KCreator’s Stem Separation technology.
Alt. Version – This is any other version of the same song you
uploaded in Tab 1, that you would like to use. For example, this may be an instrumental version of the
same song you purchased. While the Song W/O the vocals is good quality, instrumental version that were
recorded without the vocals or from which the vocals were removed BEFORE the mixed track was created
will likely give you better quality.
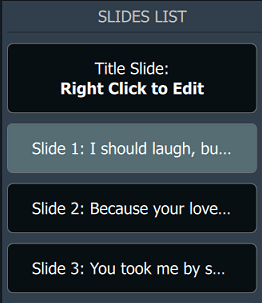
Title Slide – When the title slide toggle is turned on, in the
General Settings section, the Title Slide which is the first slide in the Slide List becomes enabled.
Once enabled, right clicking the Title slide in the slide list will open the editing screen and enable
you to customize it. It is shown below.
Each of the 5 blocks of text in the center can be turn on or off using the toggles at the top right. For
each of these five blocks that is enabled, you can select it with your mouse and, using the controls on
the right, change the text color, font style, etc.
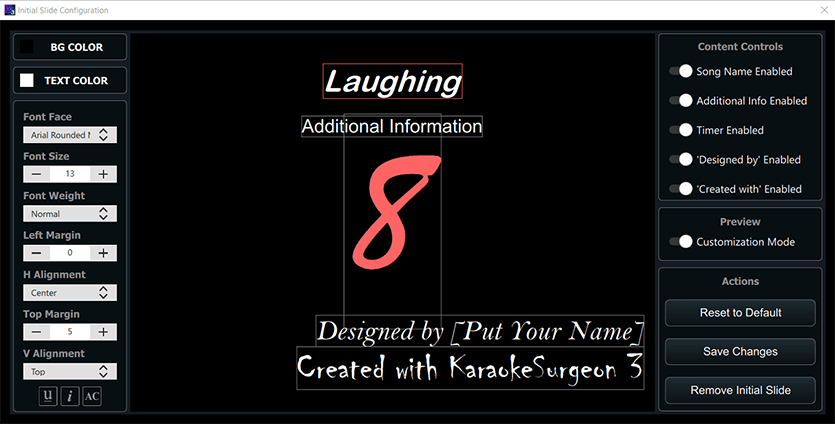
Once you have created this Title Slide click the Save Changes button and these changes
will be saved and,
assuming the Title Slide is enabled when you go to Step 6 and create the final song,
will appear in the
karaoke file created by KCreator. Once you are satisfied with the layout or design of your karaoke
lyrics, click Tab 6 tab at the top
Step or Tab 6 Create File
When you click Tab 6, the following dialog window will

From this dialog you can select the file type – either a CD+G or a mp4 file. The file name field is
blank. Assign a name for the karaoke file you are about to create by typing it into this field. The
default file location for the file that is about to be created is found here
C:\Documents\Karaoke Surgeon 3\KCreator\
If you’d you like to save in a different location you can browse and set a different
path in this dialog window. When ready, click the SAVE button at the bottom right and KS will create
your karaoke file.
KCreator Shortcuts
The following keyboard shortcuts can be found in KCreator
| C Key |
Toggles between Pause and Play |
| Control + Z |
Undo |
| Control + Y |
Redo |
| Tab 3: B (Beginning) and N (End) |
This keys set the beginning and end points of the bubble creation tool. Delete key for deleting
slide
|
| Tab 4: M Key |
When Toggled on this key sets the end point of one bubble and the beginning of the next. |