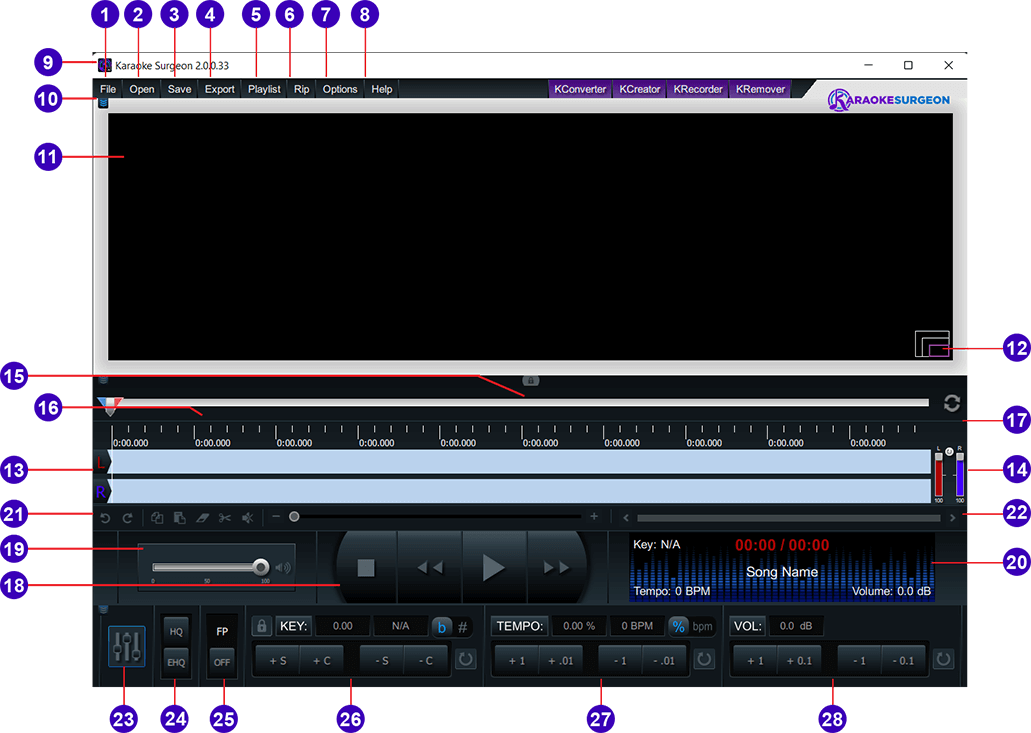
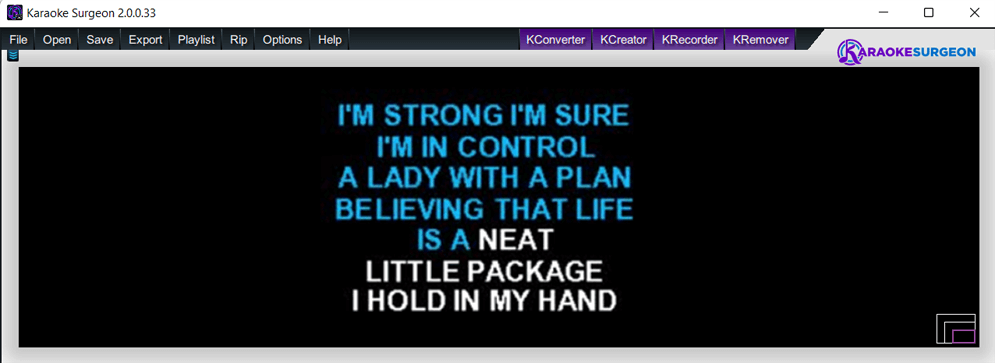
The Main or Editing Module
Shown immediately below is the Main or Editing Module. This module enables users to open and edit existing
files. Key, tempo, volume, EQ, and file length can all be changed in this module.
1
File Button
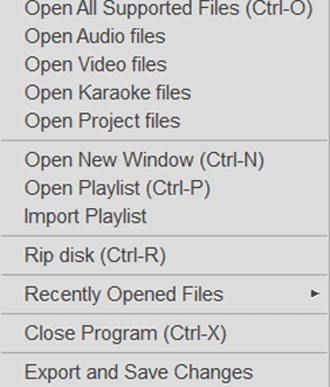
The File button at the top left of the software has the expected functionality of allowing a user to do
several different things. This selection in the File button can be seen to the immediate right.
A. Open All Supported Files opens a dialog window and allows users to browse their computer to select a
file. Because it is set to ALL, it will show any/all file types which Karaoke Surgeon (KS) can open.
B. The Open Audio Files selection changes the file type in the dialog to audio only, so only audio files
will be visible. It supports the following audio formats: mp3, aif, wav, m4a, aac, wma, mp1, mid, and
cda.
C. The Open Video Files selection changes the file type in the dialog to video formats, so only video
files will be visible from within the dialog window. It supports the following video formats: avi, mpg,
mp4, mov, wmv, and webm.
D. The Open Karaoke Files selection changes the file type in the dialog to Karaoke formats, so only
karaoke files will be visible. It supports the following karaoke formats: cdg, dat, zip, and bin.
E. The Open Project Files - The Main Editing module has the ability to save your work as a project file
(Section 3). The Open Project file selection here in the Files menu allows you to select a previously
saved Project file and re-open it in KS2.
F. Open New Window opens another KS window on your computer screen.
G. The Open Playlist selection opens a dialog and allows you to open a KS playlist (.ksp) file.
H. Import Playlist allows a user to select an iTunes playlist file (.xml format) or a Windows media
playlist (wpl) file and open it within KS.
I. Rip Disk open the Ripping dialog window within KS and allows you to rip an audio CD, a CD+G, DVD or a
VCD disc. More details about this function are available later in this document.
J. Recently Opened Files shows you a list of your recently opened files. You can control the number of
files displayed here in the Options button of the software. You can also see recently opened files by
right clicking the Open button.
K. Export and Save Changes is the same function that is found in the Export menu at the top of the User
Interface (UI). This option is discussed in more detail in a later section of this document.
L. The last option in this File menu is Close Program. This will close the program when selected. If you
have a file open in the KS2 it will prompt you before closing and potentially loosing your changes
2
Open Button
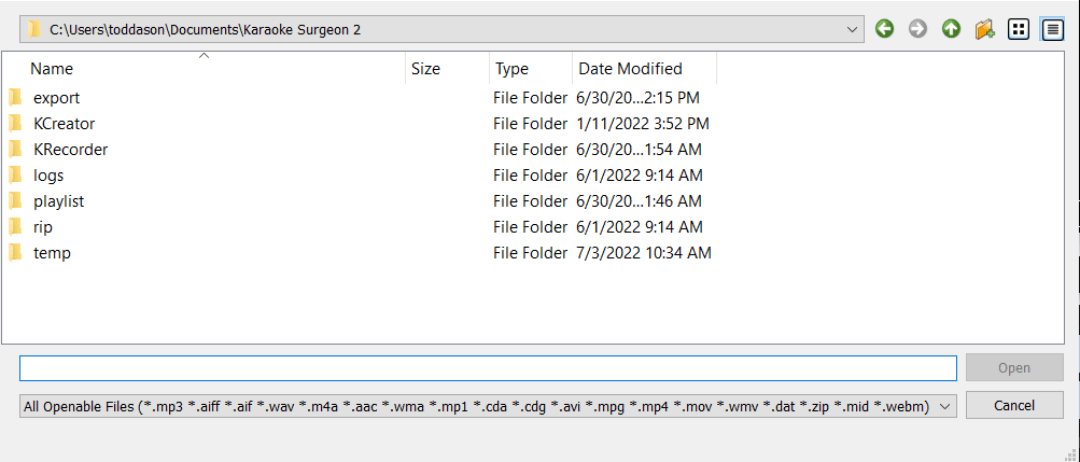
The Open button opens a dialog window similar to the one opened from the File menu
discussed above. By default, the All Openable Files are selected in this dialog window (at the bottom).
The default location for the path shown in this dialog window can be changed in the Options button of
the program.
3
Save Button
When working on a project in the Editing screen of Karaoke Surgeon there are two ways to “save” your
work. One is the Save command which will save all of your onscreen settings and changes in a Project
file. This project file can be reopened at any time. When it is KS will reapply all of your original
settings so you can pick up where you last left off. Project files .ksp files are internal files used by
KS2. They are not playable or useable by any other program.
Once you have made all of the changes you need or want to make to a file you objective should be to
create a new file with those changes permanently embedded in it. To do that you will use the Export
command which is the second way of “saving” your changes.
When you use the Save text button the first time after opening a file in KS2, it will open a dialog
window and allow you to assign a name to the project file. Thereafter and subsequent clicks of this
button will simply save any changes you’ve made with that existing file name. If for some reason you’d
like to use a different name after assign a name to the project that is open, you may right click the
Save button and you will again see the dialog window allow you to assign a different name.
KS2 project files save the following parameters:
- Player handle position
- L/R channel values
- Zoom value
- Scroll value
- HQ / EHQ
- FP on/off
- Key value
- Tempo value
- Volume
- Shift audio
- PLUS any changes made from the timeline editing menu (copy, cut, paste, delete, change volume,
etc).
4
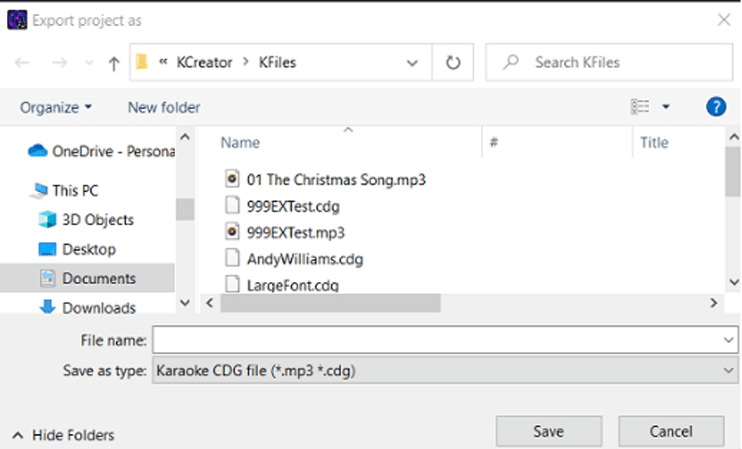
Export Button
The Export option is used for saving changes made in KS in a new file. KS can modify the key,
tempo, EQ, volume, file length and formants in a file or song. On Export those changes
become permanent and are stored in a new file. When you click the Export button, the dialog that opens
will, by default, insert the same file type and name of the file you have open. You may rename the file
and select the file type you’d like to create.
If your file has lyrics and you want to save those lyrics you will need to select a format that does so
such as a CD+G or video format. If your file does not contain lyrics then you should save it as a
standard audio file.
5
Playlist button
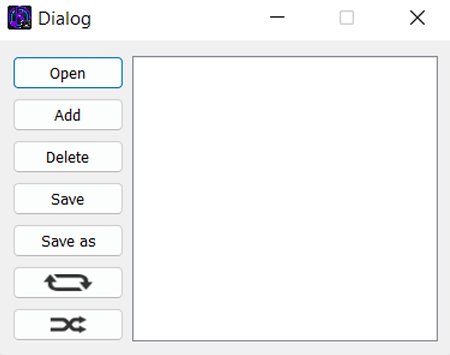
When the Playlist Button is clicked, it will open the playlist dialog has shown below. From this window
you can open a playlist, add files, delete files, save the playlist or use “save as” to save with a
different name. You can also use the buttons at the bottom to play a file repeatedly or to play the
files in the playlist in a random order. Lastly, clicking on a file in the playlist window and holding
and dragging your mouse will enable you to re-arrange the file order. The Playlist button opens a drop
down with several selections as shown here.
A. The Open Playlist option opens a dialog window to the default playlist folder and
allows you to select a playlist to open.
B. The Add button allows you go browse and select a file or files to add.
C. Clicking the Delete button after selecting a file or files in the playlist window
will delete those files from the playlist
D. Save As will open a window and allow you to assign a different or new name to a
playlist you have created or modified.
E. The Circular Arrow is a repeat play button
F. The bottom arrow is a random play button.
In addition to using the “Add” button to add songs, files can also be dragged and dropped onto this
playlist window. Lastly, files can be rearranged within a playlist by grabbing them and moving them with
your mouse.
6
Rip Button
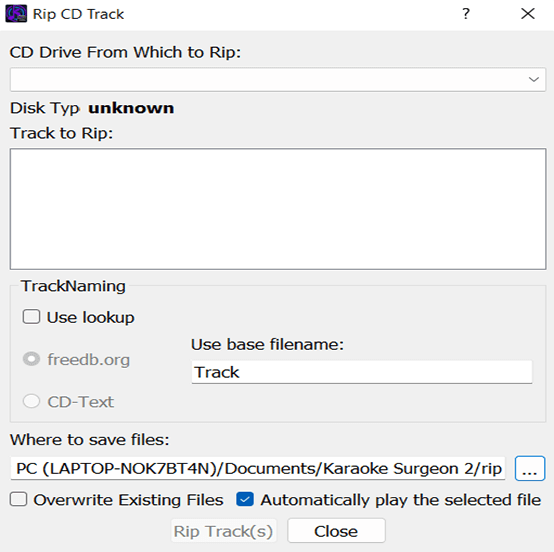
The Rip Button opens a rip dialog window that looks like what is shown on the right. The rip function in
KS allows you to rip audio CD’s, CD+G discs, VCD discs and DVD discs.
Once you open the dialog you should select the location of your CD drive. Once done, KS will auto-detect
the type of disc and prepare to rip it.
Karaoke Surgeon will either look up the track names or use a default name. If “Use lookup” is selected,
KS will use an online database to find the track names or read them from the CD’s metadata, using the
radio buttons.
If “Use lookup” is deselected, KS will use a placeholder label: the default is “Track”, and KS will save
files as “Track 01”, “Track 02”, and so forth.
Please note that if the list of tracks is blank or empty, it is likely because you have selected "Use
Lookup" and there are no matches for this CD in the database. If the Track Name section of the dialog is
empty, please deselect "Use Lookup" and you should then see a list of tracks appear.
The default save location is C:/Users/User_Name/Documents/Karaoke Surgeon 2/rip/. Change the save
location either by clicking the location box and typing in a new file path, or clicking the “...” box to
the right and navigating to the correct location.
Overwrite existing files us deselected by default. If files already exist in the chosen save location
with the same name, this option will overwrite them with the tracks on the current CD. For example, if a
previous CD has been ripped with the default of “Track 01, Track 02,” etc., and a new CD is saved in the
same location with the same default track title, the new tracks will replace the old ones.
Automatically play the selected file is selected by default. This option allows you to click onto a
track and hear it play. This is helpful if you don’t know which track(s) you want to select by name, but
can recognize them if you hear them.
Finally, select “Rip Tracks” at the top right hand side to complete the rip or “Cancel ” to close the
dialog window. If no tracks are selected it will rip all tracks. If a track or tracks are selected it
will rip ONLY the selected tracks. You can select/deselect tracks using your mouse and Shift and/or
Control keys.
7
Option Button
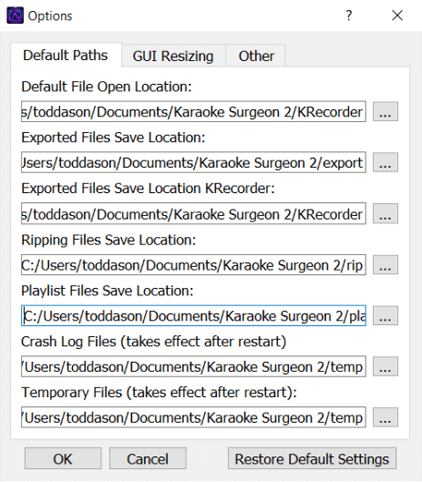
The Options Button opens the dialog window shown to the right. This window has three tabs within it. The
first tab contains default paths. These subfolders are created by default when the program is installed
on your computer.
You can change these paths by editing directly on this page or you can click the button on the far
right, with three dots which will open a window and allow you to browse to select a new location.
The second tab is labeled GUI Resizing. This tab displays a drop down field from which you can select a
different value, other than 1.0 which is default. Numbers larger than 1 will resize the User Interface
to a larger size. Numbers smaller than 1 will make the UI smaller.
Once you have select a value, click OK and the UI will resize immediately. If you not satisfied with the
new size, select a different value and try again.
The third and final tab in this window is labeled “Other”. This tab contains miscellaneous setting for
KS that can be customized. Here is what you see when you open this tab.
If you want to send A/V to something other than you computer, you can select another output device that
is connect to your machine.
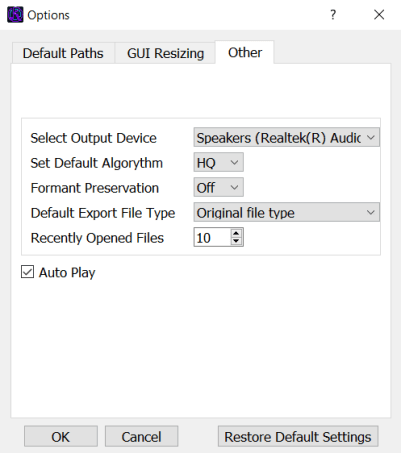
The second option is a setting for the default audio algorithm. By default it is set to HQ. In most
cases you will want to leave it there. See Section 21 of this document for a more detailed discussion of
algorithms.
Formant preservation is by default set to off. You can change the default setting on. See Section (#25) for a more detailed discussion of formants and when this should be used.
If you have a preferred file format you want or need to use when creating new files, you can set that
format here. It is blank by default, which means that on Export the dialog window will insert the same
file format as the file open in KS. If you select a format here, this file format will become the
default file format on Export that will appear in the Export dialog, though you will still be able to
manually over-ride this selection and choose an alternative format in the dialog window.
Autoplay is the facility that plays the audio of a file when you select a file within a dialog window,
before the file opens. This allows you to preview a file and determine if it is the one you are looking
for. By default this is selected. That means that this function will be enabled in every dialog window
that (rip, open). You can turn this off from a dialog window or you can turn it off by default for all
dialog windows by deselecting this option.
The Recently Opened Files setting is by default set to show 10 files. You can customize this to your
liking by using values between 1 and 99.
The last setting is this section is the Auto Save time period. This is the defined time frame at which
KS2 will automatically create a backup of what you have open on the screen. By default this is set to 5
minutes. You can customize that setting to meet your own needs here.
8
Help Button
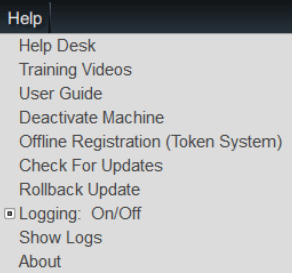
The Help Button of KS contains a number of selections. We’ll review these briefly one at a time.
The Help Desk selection will take you directly to our 24/7 Help Desk.
The Training Video selection is linked to the training videos page on KS site that contains a series of
video demonstrations of the product.
The User Guide selection in this button is linked directly to this page that you are now reading, which
is the KS2 User Guide.
Deactivate Machine is an option that will remove the license from the machine on which KS is installed
where you select that option. This is something you should do if you want to STOP using the program on
an existing machine and free up a license for an install on a different machine.
Offline Registration is a method of activating the software used ONLY for machines that cannot be put
online. This option is only used in conjunction with the Help Desk. If you need to activate a machine
that is offline, please contact the Help Desk and they will assist you with this issue.
Check For Updates will tell you if there are any updates to the current version of KS you are running.
Roll Back Update will return your machine to the previous version you had, prior to your running the
update. You may want to roll back if for some reason the program doesn’t run correctly with the new
build.
Logging On/Off is by default turn off. If you have an issue with KS our support staff may ask you to
enable this feature. When it is enabled, KS will log the operations of the software and this will help
us diagnose potential problems. When the button next to this option is select (as shown in this example)
logging has been turned on.
The Show Logs option, opens the folder where these logs are stored for easy access.
The About button will show you the current version and build of the software installed on your machine.
It also displays your machine name or identifier as used in our system (in your My Account page). It
also contains other legal and ownership information.
9
File Stats

When you open a file, KS displays here, at the very top of the UI, the file characteristics of the open
file including file type, bit rate, fps, and other file specifications.
10
Collapse Button
This little button immediately below the File menu button is a collapse button. It can be found on three
different locations of the UI. This button will collapse or hide parts of the UI to provide a more
compact size. There are three of these buttons on the UI.
11
Video/Graphics Screen
This is the main video screen for the software. The video or Karaoke graphics will appear in this
window. If the file you have opened is an audio file, this window will remain blank.
12

Lyrics Resize
In the bottom right corner of the video/lyrics display area there are 3 concentric rectangles as shown.
These represents the different possible sizes of lyrics to be displayed. Each click of this icon changes
the size of what you see. The smallest size is the default CD+G size. The next size is a doubling of the
smaller size. The last size is a fullscreen size.
13
Audio Data Graphing
This is the plotted audio data for the open file. On the far left you can see the channel designations
of Left and Right. If you click either the L or the R, you will see the color of this text change and
you will also see the data in L/R channel change. Anytime you see the color of the L or R channel label
a different color than the channel data, you know the channel data has been switched. Simply click the L
or R text symbol again to switch it back.

14
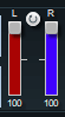
Audio Channel Sliders
On the right side of the channel data are two small channel sliders. These sliders control the volume
sent to each channel. By default they are both set to 100% but can be adjusted as desired. These channel
sliders are integrated with the pre-amp sliders found in the EQ which controls the levels.
15
AV Sync Icon

The small semi-transparent icon in the middle of the screen just above the slider and below the video
window is a A/V sync button. This button, when clicked, opens a utility that allows users to move the
audio right or left to synchronize it with the video, if not synchronized.
16

Progress Indicator/Selection Tool
This area of the UI is the progress indicator. The thumb shows the relative playback progress of the
file that is opens in the program. Nested against this progress indicator are the left and right hand
side selection tool which are used when editing. This will be discussed in more detail in the Editing
Section.
17

Replay Button
This circular arrow at the right hand side of the progress indicator is a replay button. When selected
or On it is highlighted in blue, when off it is in the default state and gray.
18
Playback Controls

The playback controls consist of the following items. On the right is the Stop button. In the center is
a forward arrow which is a play button. When click starts the song playing and then toggles to a light
blue pause button. If clicked again the song is paused at its current playback position. The double
arrows left and right are Fast Foward and Fast Rewind arrows. With each click they move in 5 second
increments.
19
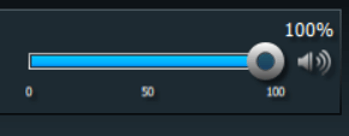
Volume Control (Playback)
To the left of the above playback controls is the volume slider. This slider controls the volume of the
file that is playing. On the right had side of the slide is a volume symbol which, if clicked, changes
in shape and color and mutes the song completely.
20
File/Song Data Display
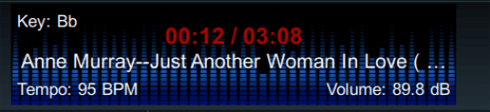
To the right of the playback controls is the Display area which shows useful data about the currently
loaded and playing file. In this display window KS2 shows the detected key, tempo, and volume of the
file. It also shows the file or song name and it shows the current playback position and the length of
the file.
21
Timeline Editing Menu
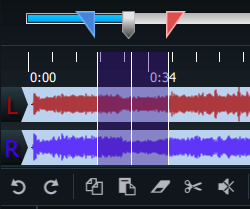
The next area on the UI is the file edit menu. This controls are shown to the right. These are used
after a selection of a portion of the file has been made. This selection is made wit the selector tool
that is nested against the progress indicator. To select a portion of the file grab the left (blue) and
right (red) handles and slide them to encompass a specific part of the timeline which is to be edited. A
description of these editing functions follow:
A. The first two circular arrows are undo and redo buttons
B. The next item is a copy icon or button. Clicking it make a copy of the selected area of
the timeline and place save it for pasting in a different location
C. The next button is the Paste button. When clicked it will paste the data previously copied to the
timeline. When clicked you will see three options. Paste at the beginning, end, or at the current
position (where the progress indicator is located).
D. The next button is the erase or delete button. It will delete the selected area from the
timeline.
E. The scissors button which follows is the cut button. It is similar to copy button in that when
selected it will copy the section of the data selected for pasting. It is different in that when the
paste button is selected the selected data is deleted from the original location and pasted in the
new location.
F. The last item is the volume/silence change button. When you click it you’ll see a submenu with
four options. You can insert silence, silence a selected area, reduce the volume of a selected area
22
Timeline and Video/Graphics Zoom Sliders
The next two items to the right of this Edit Toolbar are sliders. The first one is zoom that zooms the
timeline area to assist in the precise placement or setting of the selection tool for editing. The
second slider is a timeline navigation slider. By dragging it left or right, no matter what the zoom
level is, users can quickly navigate and see the entire timeline.
23
31 Band EQ
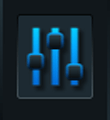
Next, we’ll review the bottom Controls and Affects section of this main Editing Module, starting from
the left and working to the right. The button on the far left showing the sliders is for opening the 31
band EQ.
With a thirty-one band graphic equalizer, each band covers one third of an octave (you can work this out
from the fact that one octave represents a doubling - or, going the other way, halving - of frequency,
and there are ten octaves between 20Hz and 20kHz: on a 31-band graphic there are three steps between
each doubling of frequency). This EQ configuration provides a great deal of control over frequencies and
therefore over the sound you hear. This sophisticated EQ configuration is very useful to musicians or
people that transcribe music, as it allows them to diminish unwanted sounds and to enhance others.
When you click this graphic the EQ will open and it should work something like this.
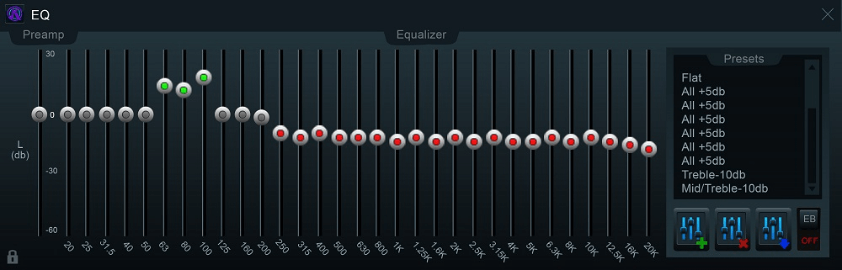
The preamp band is at the far left by itself. Use this to adjust the preamp volume. Below the preamp
band, at the bottom left of the Equalizer window, there is a lock icon; click the lock to separate the
equalizers for the left and right channels. By default the two channels are locked together. Any
adjustments made while locked will be made to both channels of data simultaneously. Please note that
this lock/unlock feature applies only to the EQ bands, it does not apply to the pre-amp sliders.
The EQ bands can be adjusted in any of four ways:
A. Click onto and drag a slider with your mouse to move it up or down.
B. Right-click in the track, above or below a slider, and the slider will snap to the cursor
position.
C. Right-click in the black area between any two slider grooves and release. Then move your mouse
left and right or up and down, and you will see the EQ bands follow the movement of your mouse. This
is an easy way to adjust multiple bands very quickly. Right click again, in the black area between
the slider grooves, and this functionality will be deactivated and the EQ bands will remain where
you placed them.
D.Hold the control key down, and click on a band or a group of bands; then use the up/down arrow
keys to adjust the
group.
For ease of use, the EQ bands are color-coded; the default position is gray. When a band is set above
zero (0) the adjustment slider turns green, and when any band is set below default the slider turns red.
At the right of the EQ window is a preset menu, which can be used to select from a range of preset EQ
options. Click on any of the options to use it. When you do you’ll see the 31 bands adjust to display
the settings for the selected preset.
The three buttons at the bottom, right edge of the EQ window are used to modify EQ settings. When a
desired setting is reached, use the top, green checkmark button to save a preset. Use the middle button,
with a red X, to delete a preset; use the bottom button to modify an existing preset. Default presets
cannot be deleted or modified.
It is important to note that EQ is applied to the entire audio file. Any EQ settings applied to a file
open in KS can be heard in real time. When the Export command is used and a new file is created, EQ
changes will be applied to this new file.
The last area to review regards the presets. System presets cannot be modified or erased. However, you
can create new presets based upon the existing ones by selecting a preset, modifying it to meet your
needs, and then saving it with a new name. To create a new preset, you click the button with the green +
sign, give it a name, and the click okay -- this will create a new preset. If you want to save this new
preset permanently so that it stays in the list of presets, you must click the button with the BLUE
arrow to save it. The delete button will allow you to delete ANY custom preset, but it will NOT allow
you to delete System presets.
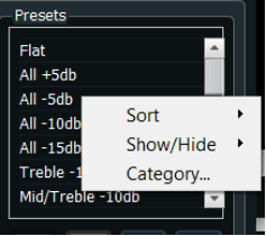
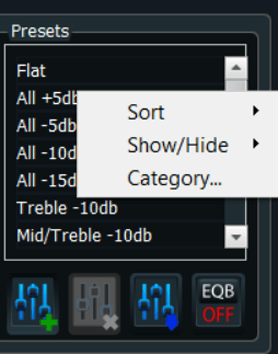
If you right click in this preset area you will see some additional selection appear. These selections
will enable you to sort the list, or filter the list, so that you can get the group of presets on your
screen that you would like to use. To refine your list further, you can also use the hide/view button to
hide or remove presets from the visible list. Once you have refined your list of presets, you will need
to click the SAVE button (blue arrow) to save this list of presets so it loads the next time you open
KS.
Lastly we will discuss the EQ-B button on the far right (which is the EQ bypass button). If you have a
song open and playing in KS and you have EQ applied to it, selecting the EQ Bypass and toggling it ON
will ignore the currently applied EQ and the song will continue playback with no EQ applied. Note that
when you do this, the buttons become blue and inactive/you can't move them. When you toggle the bypass
off, the EQ is again applied to the file and the buttons are re-activated.
24

Audio Quality Settings
The default audio algorithm is the HQ setting. A second, slightly higher quality setting, EHQ, is
available. If you have a good quality file to start with, the HQ setting should give you high quality
distortion free audio reproduction. The EHQ may be slightly better but it will require a significant
amount of your CPU and memory resources. In fact, it is common that if these EHQ setting is selected
playback in real time may be a problem, because the processing cannot keep up with the playback.
However, if you export and create a new file, the newly created file will have the changes embedded in
it that you made on the screen and once it is created it will playback normally in any audio player.
25

Formant Preservation Toggle
FP stands for formant preservation. Formants is a technical term used by audio engineers. For our
purposes here, the FP switch eliminates or at least reduces significantly the chipmunk or munchkin sound
that is created when the key of a song is changed that which has vocals. FP is turned off by default,
however if you are working with a song that has vocals or background vocals and are changing the key
more than ½ step you should turn the FP switch on to preserve the formants and eliminate these unwanted
vocal artifacts. If formant preservation is turned on it will be applied to the file as it is being
exported, preserving the formants, so the new file will sound exactly like it did when played in the KS
before exporting it.
26
Key Module
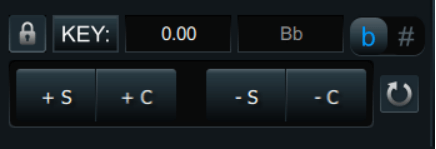
When a file is opened, KS will automatically detect and display the key. Using the flat/sharp buttons
you can select to have key shown as a sharp or a flat. If you think the detected key is incorrect and
would like to change it, you can click the padlock to unlock the detected key. After that a different
key value can be selected and the lock then clicked to lock the module with this new key.
The key area of the UI has two settings. The first is labeled + /- S for changing the key by a semitone
or ½ step at a time. The second button is for cents. This will change the key of a song by 1/100th of a
semitone. As you change the key of the song you will hear it immediately, in real time. Note that the
change of a cent or several cents is such a small change that most people cannot hear the change.
As you change the key, this module will show you what the current change is. For example 1.12 means a
change of 1 semitone and 12 cents is being applied. Also, as you change the key in semitones, KS will
change the detected key correspondingly and you will hear this change in real time when the song is
played.
The circular arrow found in this area is a rest and returns the key of the song to its “0” or no key
change. Any key change that is made in the program can be made permanent by using the Export function to
create a new file.
27
Tempo Module
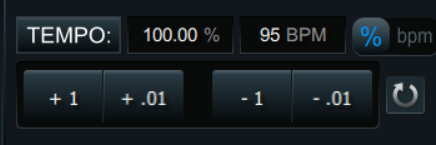
On opening a file, KS2 automatically will detect and display the tempo. It will be necessary in some
cases, because it does not know the time signature of a song, to ask you which of two possible tempo’s
you’d like to use.
KS2 displays the tempo in both BPM’s and as a percentage. By definition, when a file is opened the
detected BPM of a song is 100%. The controls in this area allow you to change the song either in units
of BPM or percentage by selecting the units you’d like to use. The selected unit is highlighted in blue.
Like key, as a song is playing and you make any change in tempo you will hear it in real time, and as
changes are made they will be shown here in this module. The circular arrow found in this area is a rest
and returns the tempo of the song to its default or 100%. Any tempo change that is made in the program
can be made permanent by using the Export function to create a new file.
28
Volume Module
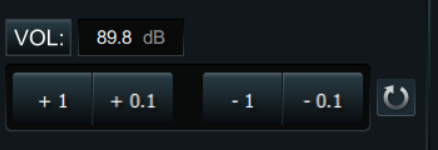
At the far right side of this bottom area is the Volume module. When a file is opened, KS will detect
and display the volume of the song in DB. Unlike the volume slider next to the playback controls which
changes the volume only for playback purposes, this module will the maximum volume contained within the
song permanently.
As shown in the associated picture, volume can be increased or decreased by either 1 Db or 0.1 Db at a
time. As you change the volume you will hear the volume change in real time as the song is played ---
assuming you keep the playback volume slider at some constant volume. Any changes made to volume will be
permanent when the Export command is used to create a new file.
A couple of important points need to be made concerning this module. The first is that a 10 Db change is
approximately a doubling or halving of the volume. This is an important reference point for you to keep
in mind. Secondly, if volume is increased too much distortion will be introduced and this cannot be
removed once it is saved in a new file. While there is no common value at which a song will “clip” and
distortion will be introduced, generally speaking this most often happens between 90-100 Db. Therefore
if your song is already in this Db range, be very, very cautious about increasing the volume.
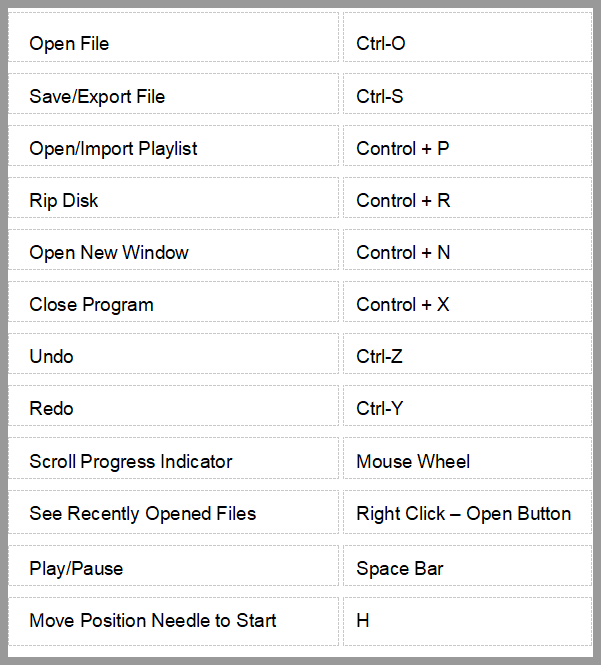
Keyboard Shortcuts
The main Editing Module of Karaoke Surgeon employs a number of keyboard shortcuts to simplify the
operation of the software. Please review the list below and familiarize yourself with them.